SQL Writer Service

SQL Writer Service


SQL Server 2008 R2 Other Versions SQL Server "Denali" SQL Server 2008 SQL Server 2005

The SQL Writer Service provides added functionality for backup and restore of SQL Server through the Volume Shadow Copy Service framework.

 
The SQL Writer Service is installed automatically. It must be running when the Volume Shadow Copy Service (VSS) application requests a backup or restore. To configure the service, use the Microsoft Windows Services applet. The SQL Writer Service installs on all operating systems.

Purpose

 
When running, Database Engine locks and has exclusive access to the data files. When the SQL Writer Service is not running, backup programs running in Windows do not have access to the data files, and backups must be performed using SQL Server backup.
Use the SQL Writer Service to permit Windows backup programs to copy SQL Server data files while SQL Server is running.

 
Volume Shadow Copy Service

 
The VSS is a set of COM APIs that implements a framework to allow volume backups to be performed while applications on a system continue to write to the volumes. The VSS provides a consistent interface that allows coordination between user applications that update data on disk (writers) and those that back up applications (requestors).

The VSS captures and copies stable images for backup on running systems, particularly servers, without unduly degrading the performance and stability of the services they provide. For more information on the VSS, see your Windows documentation.

 
Virtual Backup Device Interface (VDI)

 
SQL Server provides an API called Virtual Backup Device Interface (VDI) that enables independent software vendors to integrate SQL Server into their products for providing support for backup and restore operations. These APIs are engineered to provide maximum reliability and performance, and support the full range of SQL Server backup and restore functionality, including the full range of hot and snapshot backup capabilities.

  
Note

 
A VSS writer (MSDE Writer) shipped with the VSS framework in Microsoft Windows XP and Microsoft Windows Server 2003. This writer coordinates with SQL Server 2000 and earlier versions to help in backup operations. Starting with SQL Server 2005 installation, SQL Writer is the preferred writer, though MSDE Writer will continue to work and will be the default writer if installed and SQL Writer is not enabled. To start and use the SQL Writer, first disable the MSDE writer from enumerating SQL Server 2005 databases.

Permissions

 
The SQL Writer service must run under the Local System account.

Features

 
SQL Writer supports:
  1. Full database backup and restore including full-text catalogs
  2. Differential backup and restore
  3. Restore with move
  4. Database rename
  5. Copy-only backup
  6. Auto-recovery of database snapshot
  
SQL Writer does not support:


  1. Log backups
  2. File and filegroup backup
  3. Page restore


The form cannot be rendered. This may be due to a misconfiguration of the Microsoft SharePoint Server State Service

If you have created your SharePoint 2010 farm manually without running the farm Configuration Wizard, you might encounter this error when you try to publish a page or stating a workflow:


 The form cannot be rendered. This may be due to a misconfiguration of the Microsoft SharePoint Server State Service. For more information, contact your server administrator.”


The problem is stat the State service is not configured since the Farm Configuration Wizard has not been run. Configure it with PowerShell using these instructions from Technet:


1.On the Taskbar, click Start, point to Administrative Tools, and then click Windows PowerShell Modules.


2.In Windows PowerShell, create a service application by typing $serviceApp = New-SPStateServiceApplication -Name “State Service”


3.Create a State Service database and associate it with a service application, by typing New-SPStateServiceDatabase -Name ”StateServiceDatabase” -ServiceApplication $serviceApp.


4.Create a State Service Application Proxy and associate it with the service application by typing New-SPStateServiceApplicationProxy -Name ”State Service” -ServiceApplication $serviceApp -DefaultProxyGroup.


Once these instructions are run, you have a shiny new State Service Service Application and you should be able to publish pages again. Remember to verify that your web Application is associated with the State Service Service Application.


Chart web part raising error (SharePoint 2010 )

. Go to "Application Management" --> "Manage service applications"


2. Check whether the "State Service" is enabled or not (like the below screenshot).


3. If the service is not started or missed, we should configure/start the state service. OK. How to start the service? proceed with step
4.Go to the "Configuration Wizard" and start the configuration
5. Make sure the "State Service" is enabled. (Eventhough it is selected, run the wizard again.Hmmmm...That is microsoft :) )
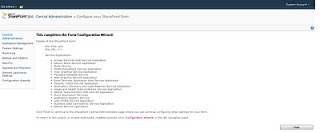
6.Wait until you see the below screen (It will take few minutes to complete).


 7. Now, check whether the Chart contol are rendering properly in the browser or not. If everything is fine, then continue with your work.. Again if you are getting the same error screen, you need to check the "Service Associations" for your current web application (proceed with step 8).


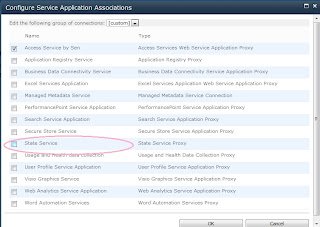
8. In "Central Administration", Go to "Application Management" and select the "Configure service application associations" in "Service Applications" section.

9. Click on your web application and a pop up windows will be displayed.


10. Select the "State Service" Check box and click "OK".

Error message when you post a purchase order in Microsoft Dynamics AX 2009


Error message when you post a purchase order in Microsoft Dynamics AX 2009: "Cannot create a record in Purchase order header - Updating table (PurchParmSubTable)"

SYMPTOMS

When you post a purchase order in Microsoft Dynamics AX 2009, you receive the following error message:
Cannot create a record in Purchase order header - Updating table (PurchParmSubTable).
This problem occurs if one of the following conditions is true:
You enable the "Life sciences electronic signature audit trail setup" setting for all tables.
You create a record for the Common table.
You set the PurchParmTable table in the database log.
This problem occurs when you post a purchase order, a receipts list, a packing slip, and an invoice.

This problem occurs in the following products:
Microsoft Dynamics AX 2009 with Service Pack 1
Microsoft Dynamics AX 2009

SOLUTION


Code changes

Microsoft provides programming examples for illustration only, without warranty either expressed or implied. This includes, but is not limited to, the implied warranties of merchantability or fitness for a particular purpose. This article assumes that you are familiar with the programming language that is being demonstrated and with the tools that are used to create and to debug procedures. Microsoft support engineers can help explain the functionality of a particular procedure. However, they will not modify these examples to provide added functionality or construct procedures to meet your specific requirements. Always test code fixes in a controlled environment before you apply the fixes to your production computers.

To resolve this problem, follow these these steps:
1.Overwrite the code in the insert method in the PurchParmSubTable table as follows:
public void insert()
{
    PurchParmSubTable tempPurchParmSubTable;
    ;

    select tempPurchParmSubTable where
        tempPurchParmSubTable.ParmId == this.ParmId
        && tempPurchParmSubTable.TableRefId == this.TableRefId
        && tempPurchParmSubTable.OrigPurchId == this.OrigPurchId;
    if(tempPurchParmSubTable.RecId == 0)
    {
        super();
    }
}
2.Overwrite the code in the createFromPurchParmTable method in the PurchParmSubTable table as follows:
static PurchParmSubTable createFromPurchParmTable(PurchParmTable _purchParmTable, boolean _insert = true)
{
    PurchParmSubTable   purchParmSubTable;
    systemSequence systemSequence;
    ;

    ttsbegin;

    purchParmSubTable.clear();
    purchParmSubTable.initValue();
    purchParmSubTable.initFromPurchParmTable(_purchParmTable);

    if (_insert)
    {
        systemSequence = new systemSequence();
        purchParmSubTable.RecId = systemSequence.reserveValues(1, tablenum(PurchParmSubTable));
        purchParmSubTable.insert();
    }

    ttscommit;
    return purchParmSubTable;
}
3.Overwrite the code in the insert method in the SalesParmSubTable table as follows:
public void insert()
{
    SalesParmSubTable tempSalesParmSubTable;
    ;

    select tempSalesParmSubTable where
        tempSalesParmSubTable.ParmId == this.ParmId
        && tempSalesParmSubTable.TableRefId == this.TableRefId
        && tempSalesParmSubTable.OrigSalesId == this.OrigSalesId
        && tempSalesParmSubTable.subId == this.subId;
    if(tempSalesParmSubTable.RecId == 0)
    {
        super();
    }
}
Note You must merge any existing customizations in these methods.

SharePoint install blocked due to Comptability issues on Windwos Server 2008 R2

SharePoint install blocked due to compatibility issues on Windows 2008 R2You'll get this message if you try to install SharePoint on a fresh install of Windows 2008 R2.

As of this posting both MOSS packed with sp2 and the Kbase doc referenced in the message (KB962935) are not available. The workaround, however, is very simple.

"This program is blocked due to compatibility issues"

The problem in a nutshell is any MOSS install package be it the RTM or MOSS w/sp1 don't have the latest updates in it. Because you've presumably updated your Windows 2008 and 2008 SQL Server with the latest patches, you can't install MOSS unless you repackage it with the SP2 update files. The instructions below explain how to, in a sense, repackage your MOSS install bundle with the latest updates.

1. Create a temp directory... C:\Temp2
2. Download the 2007 Microsoft Office Servers Service Pack 2 (SP2)
3. Start > Run and paste in the line below
C:\Temp2\officeserver2007sp2-kb953334-x64-fullfile-en-us.exe /extract:C:\Temp2\
4. Go to your SharePoint install and delete all the files in the "Updates" folder
5. Copy all the extracted files from step 3 to the Updates folder.
6. Install! Main link