Use multi-parameters in SSRS

 There are two primary methods I use to handle this: Filters and SQL. The Filter method is easier.

Filter Method:

  1. Create a multi-value parameter. Let's call it @Animals and you select Dog, Cat, Bird (or Select All)
  2. Your main Dataset, which will return a result set to your report, does not reference @Animals in it's where clause.
  3. Instead, click on Dataset Properties and select Filters
  4. In the Filter setup dialog, click on the column in your result set that corresponds to the Animal value.
  5. For the operator, select the "In" operator
  6. For the value, type in [@Animals]
  7. Done!

This will "post-filter" your SQL query and only return the values that have been filtered by your multi-value parameter. Only Dog, Cat, Bird records will return to your report. The downside to this approach is that the processing occurs at the Report Server level and not by your Database server, because you are not using SQL to do the work. In many cases (most cases!) I find this the easiest and quickest way to do what you want.

SQL Method:

  1. Create a multi-value parameter. Let's call it @Animals and you select Dog, Cat, Bird (or Select All). Same as the Filter Method!
  2. You will need a stored procedure for your main report Result Dataset. Let's call it sp_get_animals.
  3. sp_get_animals will take one argument, @Animals, so the calling mechanism looks like this: exec sp_get_animals @Animals
  4. When you are configuring your parameters in the Query dialog, use the following expression to define the value of your parameter: =join(Parameters!Animals.Value,",")
  5. This will create a string that looks like this: "Bird,Dog,Cat"
  6. In the body of your stored procedure, you will have to parse @Animals to pick off Bird, Dog, Cat.
  7. Once you have parsed @Animals, you can use the SQL IN clause to actually process it.

This method is definitely more complicated, but it has the advantage of passing the parameters directly to SQL and allows you to take advantage of your Database Server.

When in doubt, use the Filter method if you can get away with it. It has the advantage of simpler SQL, and more intuitive to other members of your team.

There are many examples of the SQL method on this website, and a quick Google search will also reveal examples of using SQL to do this. But like I said, it can be messy.

Good luck, and I hope this helps.

User-Defined Function Architecture

The following Microsoft SQL Server T-SQL functions are examples for scalar and table-valued UDF design:

1. dbo.fnSplitStringListXML -- applying xml xquery to split

2. dbo.fnSplitCSV -- applying charindex on number list

3. dbo.fnSplitCSVxml -- applying xml operations on number list

4. dbo.fnSplitStringList -- applying charindex on string list

5. dbo.fnNumberToEnglish -- translate number to words

6. dbo.tvfGetSalesInfoByProductColor -- like a view with parameter

7. dbo.fnSplitDelimitedStringList -- split delimited list

-- Split a comma-delimited string list with XML method

-- Table-valued user-defined function - TVF - SQL Server 2005/2008

-- Method uses XML xquery to split string list

CREATE FUNCTION dbo.fnSplitStringListXML (

@StringList VARCHAR(MAX),

@Delimiter CHAR(1))

RETURNS @TableList TABLE(ID int identity(1,1), StringLiteral VARCHAR(128))

BEGIN

IF @StringList = '' RETURN

IF @Delimiter = ''

BEGIN

WITH Split AS

( SELECT CharOne=LEFT(@StringList,1),R=RIGHT(@StringList,len(@StringList)-1)

UNION ALL

SELECT LEFT(R,1), R=RIGHT(R,len(R)-1)

FROM Split

WHERE LEN(R)>0 )

INSERT @TableList

SELECT CharOne FROM Split

OPTION ( MAXRECURSION 0)

RETURN

END -- IF

DECLARE @XML xml

SET @XML = '<root><csv>'+replace(@StringList,@Delimiter,'</csv><csv>')+

'</csv></root>'

INSERT @TableList

SELECT rtrim(ltrim(replace(Word.value('.','nvarchar(128)'),char(10),'')))

AS ListMember

FROM @XML.nodes('/root/csv') AS WordList(Word)

RETURN

END -- FUNCTION

GO

-- Test TVF

SELECT * FROM dbo.fnSplitStringListXML

('New York, California, Arizona, Texas, Toronto, Grand Canyon, Yosemite,

Yellow Stone, Niagara Falls, Belgium, Denmark, Hollandia, Sweden', ',')

/* ID StringLiteral

1 New York

2 California

3 Arizona

4 Texas

.... */

-- Test with empty string delimiter

SELECT * FROM dbo.fnSplitStringListXML ('9876543210','')

/* ID StringLiteral

1 9

2 8

3 7

.... */

-----------

-- Split comma-limited number list with the charindex function

-- Table-valued user-defined function - TVF

CREATE FUNCTION dbo.fnSplitCSV ( @NumberList varchar(4096))

RETURNS @SplitList TABLE ( ListMember INT )

AS

BEGIN

DECLARE @Pointer int, @ListMember varchar(25)

SET @NumberList = LTRIM(RTRIM(@NumberList))

IF (RIGHT(@NumberList, 1) != ',')

SET @NumberList=@NumberList+ ','

SET @Pointer = CHARINDEX(',', @NumberList, 1)

IF REPLACE(@NumberList, ',', '') <> ''

BEGIN

WHILE (@Pointer > 0)

BEGIN

SET @ListMember = LTRIM(RTRIM(LEFT(@NumberList, @Pointer - 1)))

IF (@ListMember <> '')

INSERT INTO @SplitList

VALUES (convert(int,@ListMember))

SET @NumberList = RIGHT(@NumberList, LEN(@NumberList) - @Pointer)

SET @Pointer = CHARINDEX(',', @NumberList, 1)

END

END

RETURN

END

GO

-- Test

SELECT * FROM dbo.fnSplitCSV ('')

SELECT * FROM dbo.fnSplitCSV ('1000')

SELECT * FROM dbo.fnSplitCSV ('1000,4005')

SELECT * FROM dbo.fnSplitCSV ('1000,7,9')

SELECT * FROM dbo.fnSplitCSV ('1000, 3, 8494, 2329992, 8, 23, 43')

GO

-- XML split solution for comma-limited number list

-- Table-valued user-defined function - TVF

CREATE FUNCTION dbo.fnSplitCSVxml

(@NumberList VARCHAR(4096))

RETURNS @SplitList TABLE( ListMember INT)

AS

BEGIN

DECLARE @xml XML

SET @NumberList = LTRIM(RTRIM(@NumberList))

IF LEN(@NumberList) = 0

RETURN

SET @xml = '' + REPLACE(@NumberList,',','') + ''

INSERT INTO @SplitList

SELECT x.i.value('.','VARCHAR(MAX)') AS Member

FROM @xml.nodes('//n') x(i)

RETURN

END

GO

-- Test

SELECT * FROM dbo.fnSplitCSVxml ('')

SELECT * FROM dbo.fnSplitCSVxml ('1000')

SELECT * FROM dbo.fnSplitCSVxml ('1000, 1007')

SELECT * FROM dbo.fnSplitCSVxml ('1000,7,9')

SELECT * FROM dbo.fnSplitCSVxml ('1000, 3, 8494, 2329992, 8, 23, 43')

GO

-- Split a comma-delimited string list

-- Table-valued user-defined function - TVF

CREATE FUNCTION dbo.fnSplitStringList (@StringList VARCHAR(MAX))

RETURNS @TableList TABLE( StringLiteral VARCHAR(128))

BEGIN

DECLARE @StartPointer INT, @EndPointer INT

SELECT @StartPointer = 1, @EndPointer = CHARINDEX(',', @StringList)

WHILE (@StartPointer < LEN(@StringList) + 1)

BEGIN

IF @EndPointer = 0

SET @EndPointer = LEN(@StringList) + 1

INSERT INTO @TableList (StringLiteral)

VALUES(LTRIM(RTRIM(SUBSTRING(@StringList, @StartPointer,

@EndPointer - @StartPointer))))

SET @StartPointer = @EndPointer + 1

SET @EndPointer = CHARINDEX(',', @StringList, @StartPointer)

END -- WHILE

RETURN

END -- FUNCTION

GO

-- Test

SELECT * FROM dbo.fnSplitStringList ('New York, California, Arizona, Texas')

GO

SELECT * FROM dbo.fnSplitStringList ('New York, California, Arizona, Texas,')

GO

SELECT * FROM dbo.fnSplitStringList ('New York')

SELECT * FROM dbo.fnSplitStringList ('Smith, Brown, O''Brien, Sinatra')

GO

------------

-- Translate an integer number into English words

-- T-SQL convert number to English words - scalar-valued function

USE AdventureWorks2008;

GO

CREATE FUNCTION dbo.fnNumberToEnglish (@Number INT)

RETURNS VARCHAR(1024)

AS

BEGIN

DECLARE @Below20 TABLE( ID INT IDENTITY ( 0 , 1 ),

Word VARCHAR(32) )

DECLARE @Tens TABLE( ID INT IDENTITY ( 2 , 1 ),

Word VARCHAR(32) )

INSERT @Below20 (Word)

VALUES('Zero'),

('One'),

('Two'),

('Three'),

('Four'),

('Five'),

('Six'),

('Seven'),

('Eight'),

('Nine'),

('Ten'),

('Eleven'),

('Twelve'),

('Thirteen'),

('Fourteen'),

('Fifteen'),

('Sixteen'),

('Seventeen'),

('Eighteen'),

('Nineteen')

INSERT @Tens VALUES('Twenty'),

('Thirty'),

('Forty'),

('Fifty'),

('Sixty'),

('Seventy'),

('Eighty'),

('Ninety')

DECLARE @English VARCHAR(1024) = (SELECT CASE

WHEN @Number = 0 THEN ''

WHEN @Number BETWEEN 1 AND 19 THEN

(SELECT Word

FROM @Below20

WHERE ID = @Number)

WHEN @Number BETWEEN 20 AND 99 THEN

(SELECT Word

FROM @Tens

WHERE ID = @Number / 10) + '-' + dbo.fnNumberToEnglish(@Number%10)

WHEN @Number BETWEEN 100 AND 999 THEN (dbo.fnNumberToEnglish(@Number / 100))

+ ' Hundred ' + dbo.fnNumberToEnglish(@Number%100)

WHEN @Number BETWEEN 1000 AND 999999

THEN (dbo.fnNumberToEnglish(@Number / 1000)) + ' Thousand '

+ dbo.fnNumberToEnglish(@Number%1000)

ELSE ' INVALID INPUT' END)

SELECT @English = RTRIM(@English)

SELECT @English = RTRIM(LEFT(@English,len(@English) - 1))

WHERE RIGHT(@English,1) = '-'

RETURN (@English)

END

GO

-- Test numeric-to-words UDF

SELECT NumberInEnglish=[dbo].[fnNumberToEnglish]( 999 )

-- Nine Hundred Ninety-Nine

SELECT NumberInEnglish=[dbo].[fnNumberToEnglish]( 15888 )

-- Fifteen Thousand Eight Hundred Eighty-Eight

SELECT NumberInEnglish=[dbo].[fnNumberToEnglish]

( CONVERT(INT,CONVERT(MONEY,'$120,453')))

-- One Hundred Twenty Thousand Four Hundred Fifty-Three

GO

------------

-- TVF and inline TVF like a view with parameter

-- SQL create table-valued function like a parametrized view

CREATE FUNCTION dbo.tvfGetSalesInfoByProductColor

(@Color NVARCHAR(16))

RETURNS @retSalesInformation TABLE(-- Columns returned by the function

ProductName NVARCHAR(50) NULL,

NonDiscountSales MONEY,

DiscountSales MONEY,

Color NVARCHAR(16) NULL)

AS

BEGIN

INSERT @retSalesInformation

SELECT p.Name,

SUM(OrderQty * UnitPrice),

SUM((OrderQty * UnitPrice) * UnitPriceDiscount),

@Color

FROM Production.Product p

INNER JOIN Sales.SalesOrderDetail sod

ON p.ProductID = sod.ProductID

WHERE Color = @Color

OR @Color IS NULL

GROUP BY p.Name

RETURN;

END;

GO

-- Using a TVF like a table

SELECT * FROM dbo.tvfGetSalesInfoByProductColor ('Yellow') ORDER BY ProductName

-- (34 row(s) affected)

/*

ProductName NonDiscountSales DiscountSales Color

HL Touring Frame - Yellow, 46 52404.102 0.00 Yellow

HL Touring Frame - Yellow, 50 49994.718 0.00 Yellow

HL Touring Frame - Yellow, 54 324001.9134 733.6575 Yellow

*/

SELECT * FROM dbo.tvfGetSalesInfoByProductColor ('') ORDER BY ProductName

-- (0 row(s) affected)

SELECT * FROM dbo.tvfGetSalesInfoByProductColor (NULL) ORDER BY ProductName

-- (266 row(s) affected)

GO

------------

-- SQL create INLINE table-valued function like a parametrized view

CREATE FUNCTION dbo.itvfGetSalesInfoByColor

(@Color NVARCHAR(16))

RETURNS TABLE

AS

RETURN (

SELECT ProductName = p.Name,

NonDiscountSales = SUM(OrderQty * UnitPrice),

DiscountSales = SUM((OrderQty * UnitPrice) * UnitPriceDiscount),

Color = @Color

FROM Production.Product p

INNER JOIN Sales.SalesOrderDetail sod

ON p.ProductID = sod.ProductID

WHERE Color = @Color

OR @Color IS NULL

GROUP BY p.Name );

GO

-- Using an ITVF like a table

SELECT * FROM dbo.itvfGetSalesInfoByColor ('Yellow') ORDER BY ProductName

-- (34 row(s) affected)

/*

ProductName NonDiscountSales DiscountSales Color

HL Touring Frame - Yellow, 46 52404.102 0.00 Yellow

HL Touring Frame - Yellow, 50 49994.718 0.00 Yellow

HL Touring Frame - Yellow, 54 324001.9134 733.6575 Yellow

*/

SELECT * FROM dbo.itvfGetSalesInfoByColor ('') ORDER BY ProductName

-- (0 row(s) affected)

SELECT * FROM dbo.itvfGetSalesInfoByColor (NULL) ORDER BY ProductName

-- (266 row(s) affected)

GO

------------

-- Split delimited string

CREATE FUNCTION dbo.fnSplitDelimitedStringList

(@StringList NVARCHAR(MAX),

@Delimiter NVARCHAR(5))

RETURNS @TableList TABLE(ID INT IDENTITY(1,1), StringLiteral NVARCHAR(1024))

BEGIN

DECLARE @StartPointer INT,

@EndPointer INT

SELECT @StartPointer = 1,

@EndPointer = CHARINDEX(@Delimiter,@StringList)

WHILE (@StartPointer < LEN(@StringList) + 1)

BEGIN

IF @EndPointer = 0

SET @EndPointer = LEN(@StringList) + 1

INSERT INTO @TableList

(StringLiteral)

VALUES (LTRIM(RTRIM(SUBSTRING(@StringList,@StartPointer,

@EndPointer - @StartPointer))))

SET @StartPointer = @EndPointer + 1

SET @EndPointer = CHARINDEX(@Delimiter,@StringList,@StartPointer)

END -- WHILE

RETURN

END -- FUNCTION
GO

SELECT * FROM fnSplitDelimitedStringList ('New York; New Jersey; Texas', ';')

/* ID StringLiteral

1 New York

2 New Jersey

3 Texas

*/

------------

Dynamics AX – Periodic maintenance and performance analysis

Imparted from here
Periodic clean up – Significance

A recent AX_Database analysis showed that the 5 largest tables in the database account for roughly 60% of the database size. The 4 largest tables out of 5 are tables with temporary and/or archival data: Inventory settlements (INVENTSETTLEMENT), database log (SYSDATABASELOG), temporary sales orders data (SALESPARMLINE), temporary master planning data (INVENTSUMLOGTTS). The fifth table is sales lines (SALESLINE). Periodically archiving/purging these tables would significantly reduce database size and will have beneficial effect on system performance.

Each individual table and related considerations are discussed below:

1.1 Inventory settlements.

The inventory settlements table is used to store information generated during inventory close and adjust periodic job run. This table can be cleaned up/compressed using the

Inventory management>Periodic>Clean up>Inventory settlements clean up.

Deleting cancelled settlement is a recommended procedure (when an inventory settlement/adjustment is cancelled the system does not remove the original adjustment but generates a set of reverse adjustments). The  clean up procedure will remove both the original set of adjustments and the reversing set.

Please note that Grouping (compressing) settlements should be used with care as compression cannot be reversed and settlements for compressed periods cannot be reversed as well. That means that it is better to use this function only for previous financial years (i.e. group settlements posted before date should typically current date – 1 year).

The Inventory settlements clean up  can be batch-scheduled, takes a few hours to run and is best to be scheduled overnight or on the weekend.

The suggested schedule is once per quarter.

The batch job can be setup to run this procedure over night but the dates will have to be changed before every batch is run. E.g. the batch can be setup to run at 12:00 am to purge transactions of a year ago.

Note: The purge date will have to be changed manually before every batch job as AX will not calculate a rolling date of when transactions need to be purged

Note: Please see the document on Batch job procedures for information in setting up a batch job.

1.2 Database log

The database log table is used to store logging information generated according to the log rules set up in Administration>Setup>Database log.

There are 2 main points to consider for database log maintenance.

The first one is that there should not be excessive logging. The database log setup should be reviewed and some of the rules (such as logging of all changes on sales lines) were removed. When new rules are added it is important to analyse the entries generated in the log to see that no excessive logging is performed.

The second consideration  is that the database log should be cleaned up periodically. The log can be backed up to a binary or .csv file if required using AX data  export-import utility and the clean up routine is accessible via Administration>Inquiries>Database log>Clean up log(button).

Keeping one month of logs in the system is probably sufficient especially if they are backed up to the file system.

Please note that running clean up for the first time will take significant time and affect system performance because of the amount of log data accumulated. The task can be batch-scheduled.

The suggested schedule is once per month.

Back up database log:

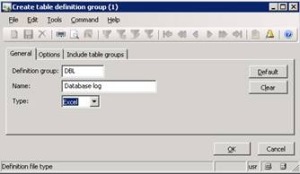
Create a definition group for database log Administration/Periodic/Data export/Import/Definition group

  • CTRL N to create a new definition group.
  • Specify a meaningful name and select type Excel to create an Excel file to back up.
  • Click OK

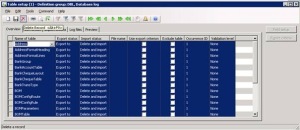
  • Click on the Table setup button

  • Select all the tables and click Delete

  • Enter ‘DatabaseLog’ in the table name, Export status = Export to, Specify the file name where the back up must be saved.
  • Close form
  • To Export file click on the Export to button, click OK button if file should be saved to the path specified in the definition group (Previous example) or click on ‘Override file names specified in definition group’ and specify a different file name.

1.3 Temporary sales order/purchase order processing data

Temporary sales order

This table stores temporary sales order line entries when a sales order is posted. The temporary lines are not deleted after posting and need to be cleaned up periodically. The clean up job can be accessed via

Accounts receivable > Periodic > Clean up > Sales update history clean up.

Delete both executed and erroneous data. There is no reason to keep more than a month’s data. Please note that running for the first time will take significant time and affect system performance because of the amount of log data accumulated. The task can be batch-scheduled.

The suggested schedule is once per month.

Note: there is a similar job in the AP module,

1.4 Temporary master planning data.

Table : InventSumLogtts

This table stores inventory movements data used by dynamic master planning. The table is supposed to be automatically purged when a dynamic master plan is run. If there are test companies in the production environment then it would add up data in this table.

Also there is no periodic job to clean up this table, so typically if a company does not use master planning data must be deleted from the table manually (e.g. using SQL server).

It might be beneficial to check this table immediately after master planning session is run to see if it purges correctly.

1.5 Sales line

This table stores sales lines. There is a periodic job in the system that can either delete or void (move to another table) closed (invoiced or cancelled) sales order lines.  The job is accessible via AR>Periodic> Delete orders.

Depending on the “Mark orders as voided” check box in AR Parameters the sales orders selected in the Delete orders periodic job will either be completely deleted from the system or moved to the voided orders table.

2 Non-production companies in the Production system

Check if the client uses test companies (e.g. TST) in production environment which for example account for around 40% of all data in the inventory settlement table.

It is not recommended to keep test companies in the production environment. If a copy of live data is required it is recommended to restore a live database backup into a separate test environment. The recommendation is to delete non-production companies from the production environment, which would lead to significant reduction in table sizes and index sizes.

If there is a requirement to copy a single company only without using the database backup standard dynamics AX import-export utility can be used to achieve this, but the SQL database back up is a faster method.

3 Periodic indexing

Table indexes should be rebuilt periodically to ensure optimum data query performance. Re-indexing should be done periodically and is accessible via Administration>Periodic>SQL administration

Recommended schedule is weekly. Indexing must also be done after any significant update to master file data, e.g. reassigning customers to a new dimension etc.

Install SQL Server 2008 on a Windows Server 2008 Cluster Part 1

Problem

In a previous tip on SQL Server 2008 Installation Process, we have seen how different SQL Server 2008 installation is from its previous versions. Now, we have another challenge to face: installing SQL Server 2008 on a Windows Server 2008 Cluster. Windows Server 2008 has a lot of differences from its previous versions and one of them is the clustering feature. How do I go about building a clustered SQL Server 2008 running on Windows Server 2008?

Solution

There have been a lot of changes regarding clustering between Windows Server 2003 and Windows Server 2008. It took quite a lot of effort for us to build a cluster in Windows Server 2003 - from making sure that the server hardware for all nodes are cluster-compatible to creating resource groups. Microsoft has redefined clustering with Windows Server 2008, making it simpler and easier to implement. Now that both SQL Server 2008 and Windows Server 2008 are out in the market for quite some time, it would be a must to prepare ourselves to be able to setup and deploy a clustered environment running both. Installing SQL Server on a stand-alone server or member server in the domain is pretty straight-forward. Dealing with clustering is a totally different story. The goal of this series of tips is to be able to help DBAs who may be charged with installing SQL Server on a Windows Server 2008 cluster.
Prepare the cluster nodes

I will be working on a 2-node cluster throughout the series and you can extend it by adding nodes later on. You can do these steps on a physical hardware or a virtual environment. I opted to do this on a virtual environment running VMWare. To start with, download and install a copy of the evaluation version of Windows Server 2008 Enterprise Edition. This is pretty straight-forward and does not even require any product key or activation. Evaluation period runs for 60 days and can be extended up to 240 days so you have more than enough time to play around with it. Just make sure that you select at least the Enterprise Edition during the installation process and have at least 12GB of disk space for your local disks. This is to make sure you have enough space for both Windows Server 2008 and the binaries for SQL Server 2008. A key thing to note here is that you should already have a domain on which to join these servers and that both have at least 2 network cards - one for the public network and the other for the heartbeat. Although you can run a cluster with a single network card, it isn't recommend at all. I'll lay out the details of the network configuration as we go along. After the installation, my recommendation is to immediately install .NET Framework 3.5 with Service Pack 1 and Windows Installer 4.5 (the one for Windows Server 2008 x86 is named Windows6.0-KB942288-v2-x86.msu). These two are prerequisites for SQL Server 2008 and would speed up the installation process later on.

Carve out your shared disks

We had a lot of challenges in Windows Server 2003 when it comes to shared disks that we will use for our clusters. For one, the 2TB limit which has a lot to do with the master boot record (MBR) has been overcome by having the GUID Partition Table (GPT) support in Windows Server 2008. This allows you to have 16 Exabytes for a partition. Another has been the use of directly attached SCSI storage. This is no longer supported for Failover Clustering in Windows Server 2008. The only supported ones will be Serially Attached Storage (SAS), Fiber Channel and iSCSI. For this example, we will be using an iSCSI storage with the help of an iSCSI Software Initiator to connect to a software-based target. I am using StarWind's iSCSI SAN to emulate a disk image that my cluster will use as shared disks. In preparation for running SQL Server 2008 on this cluster, I recommend creating at least 4 disks - one for the quorum disk, one for MSDTC, one for the SQL Server system databases and one for the user databases. Your quorum and MSDTC disks can be as small as 1GB, although Microsoft TechNet specifies a 512MB minimum for the quorum disk. If you decide to use iSCSI as your shared storage in a production environment, a dedicated network should be used so as to isolate it from all other network traffic. This also means having a dedicated network card on your cluster nodes to access the iSCSI storage.

Present your shared disks to the cluster nodes

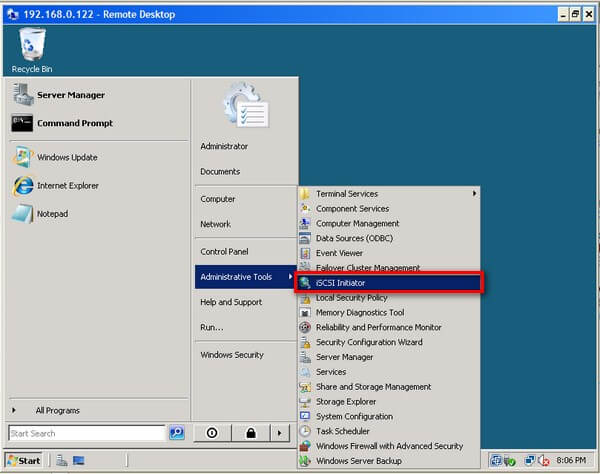
Windows Server 2008 comes with iSCSI Initiator software that enables connection of a Windows host to an external iSCSI storage array using network adapters. This differs from previous versions of Microsoft Windows where you need to download and install this software prior to connecting to an iSCSI storage. You can launch the tool from Administrative Tools and select iSCSI Initiator.

To connect to the iSCSI target:

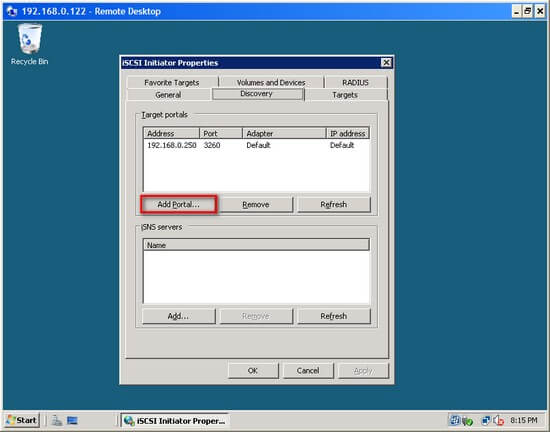
  1. In the iSCSI Initiator Properties page, click on the Discovery tab.

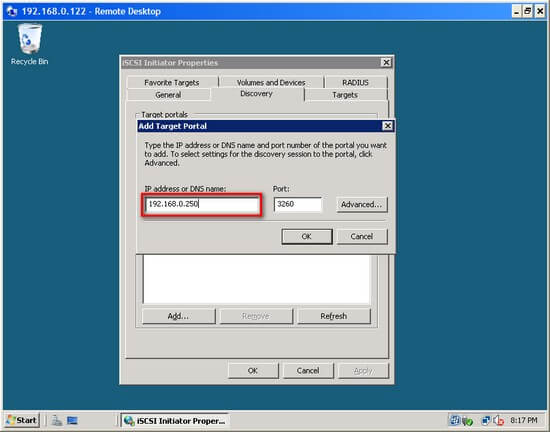
  2. Under the Target Portals section, click on the Add Portal button.
  3. In the Add Target Portal dialog, enter the DNS name or IP address of your iSCSI Target and click OK. If you are hosting the target on another Windows host as an image file, make sure that you have your Windows Firewall configured to enable inbound traffic to port 3260. Otherwise, this should be okay.

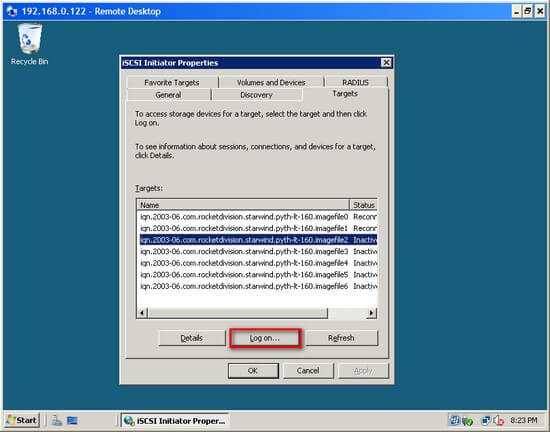
  4. Back in the iSCSI Initiator Properties page, click on the Targetstab. You should see a list of the iSCSI Targets that we have defined earlier

  5. Select one of the targets and click on the Log onbutton.
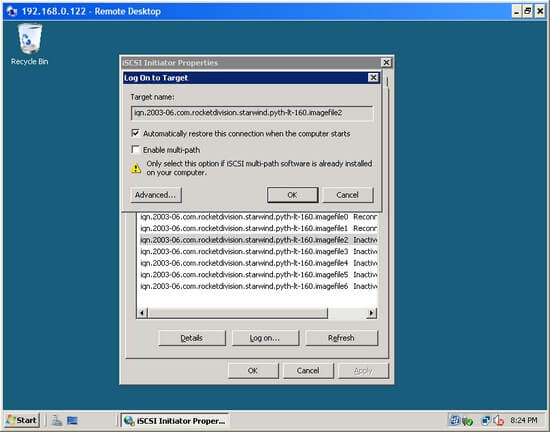
  6. In the Log On to Target dialog, select the Automatically restore this connection when the computer startscheckbox. Click OK.

  7. Once you are done, you should see the status of the target change to Connected. Repeat this process for all the target disks we initially created on both of the servers that will become nodes of your cluster.

Once the targets have been defined using the iSCSI Initiator tool, you can now bring the disks online, initialize them, and create new volumes using the Server Manager console. I won’t go into much detail on this process as it is similar to how we used to do it in Windows Server 2003, except for the new management console. After the disks have been initialized and volumes created, you can try logging in to the other server and verify that you can see the disks there as well. You can rescan the disks if they haven’t yet appeared.

Adding Windows Server 2008 Application Server Role

Since we will be installing SQL Server 2008 later on, we will have to add the Application Server role on both of the nodes. A server role is a program that allows Windows Server 2008 to perform a specific function for multiple clients within a network. To add the Application Server role,

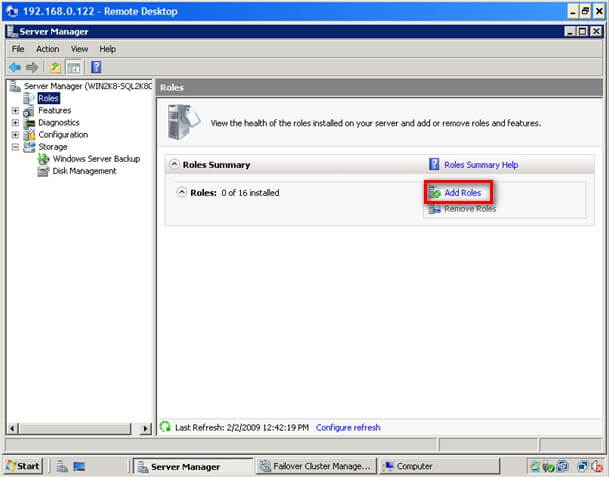
  1. Open the Server Manager console and select Roles.
  2. Click the Add Roles link.  This will run the Add Roles Wizard

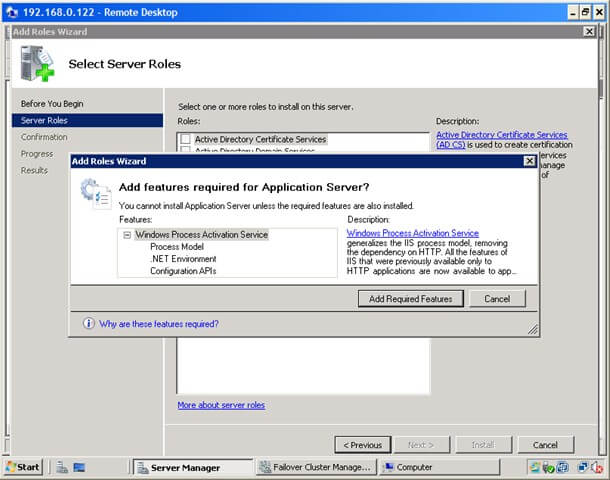
  3. In the Select Server Roles dialog box, select the Application Server checkbox. This will prompt you to add features required for Application Server role. Click Next.

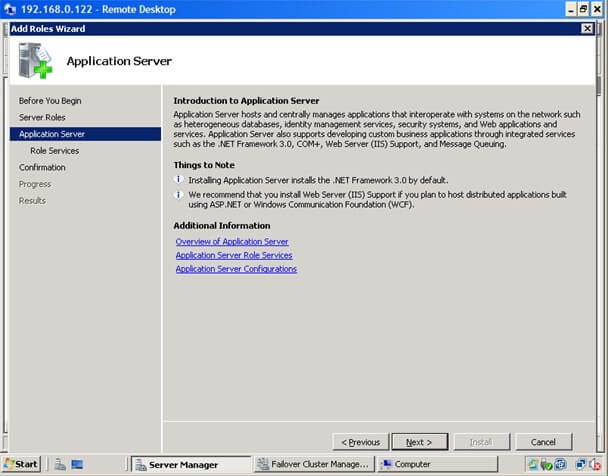
  4. In the Application Server dialog box, click Next.

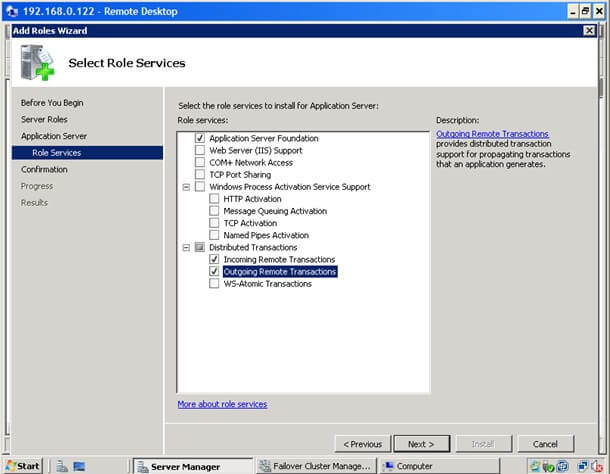
  5. In the Select Role Services dialog box, select Incoming Remote Transactions and Outgoing Remote Transactions checkboxes. These options will be used by MSDTC. Click Next

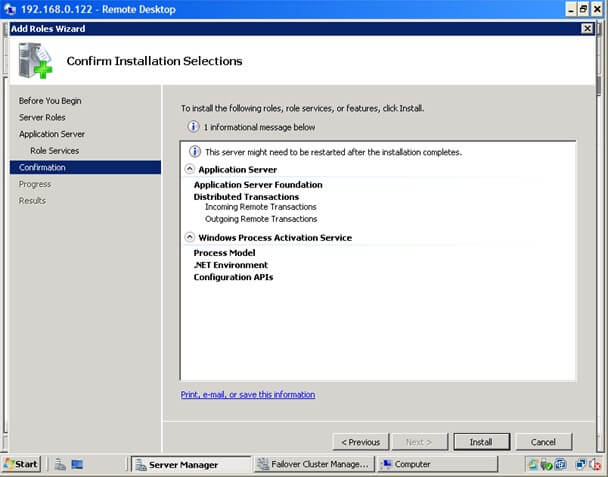
  6. In the Confirm Installation Selections dialog box, click Install. This will go thru the process of installing the Application Server role

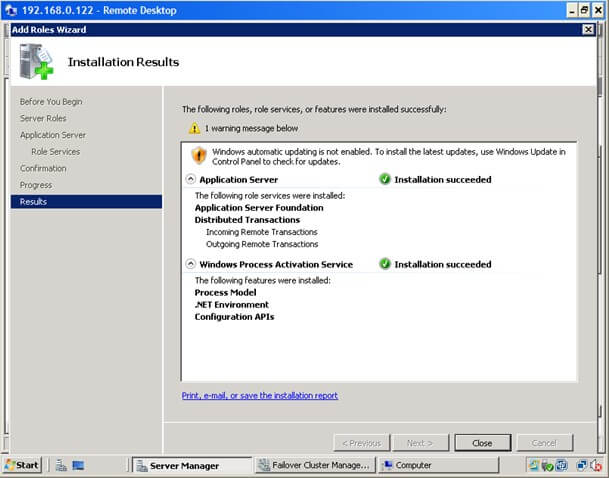
  7. In the Installation Results dialog box, click Close. This completes the installation of the Application Server role on the first node. You will have to repeat this process for the other server

We have now gone thru the process of creating the cluster at this point. In the next tip in this series, we will go thru the process of installing the Failover Cluster feature, validating the nodes that will become a part of the cluster and creating the cluster itself. And that is just on the Windows side. Once we manage to create a working Windows Server 2008 cluster, that's the only time we can proceed to install SQL Server 2008.

Next Steps

  • Download and install an Evaluation copy of Windows Server 2008for this tip
  • Start working on building your test environment in preparation for building a SQL Server 2008 cluster on Windows Server 2008
  • Read Part2, Part3 and Part4

Install SQL Server 2008 on a Windows Server 2008 Cluster Part 4

Problem

In a previous tip on SQL Server 2008 Installation Process, we have seen how different SQL Server 2008 installation is from its previous versions. Now, we have another challenge to face: installing SQL Server 2008 on a Windows Server 2008 Cluster. Windows Server 2008 has a lot of differences from its previous versions and one of them is the clustering feature. How do I go about building a clustered SQL Server 2008 running on Windows Server 2008?

Solution

To continue this series on Installing SQL Server 2008 on a Windows Server 2008 Cluster, we will look at adding a node in a SQL Server 2008 failover cluster.

  • Part 1we completed the installation of the Application Server role in both of the servers that we will be using as part of our cluster.
  • Part 2walked you through the installation of the Failover Cluster Feature, validating the servers that will be a part of the cluster, and creating the cluster.
  • Part 3completed with a working SQL Server 2008 failover cluster running on a single node.
  • In this tip, we will proceed to add a node in a SQL Server 2008 failover cluster and apply the latest cumulative updates.

Adding a node on a SQL Server 2008 Failover Cluster

Now that you have a working failover cluster, we will make it highly available by adding nodes. The number of nodes you can add in a failover cluster depends on the editions of SQL Server that you will use. A Standard Edition of SQL Server 2008 can support up to two (2) nodes in a failover cluster while the Enterprise Edition supports up to sixteen (16) nodes, which is practically the limit for the Enterprise Edition for Windows Server 2008. As most of the steps in this process are similar to the one when you were installing the failover cluster, I've skipped most of the screenshots.

To add a node on a SQL Server 2008 failover cluster:

  1. Run setup.exe from the installation media to launch SQL Server Installation Center
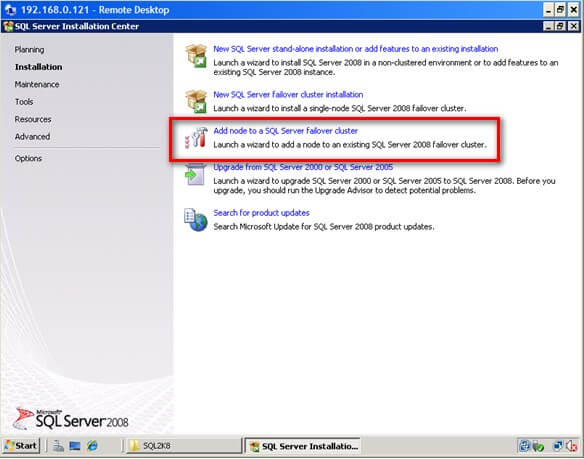
  2. Click on the Installation link on the left-hand side. Click the Add node to a SQL Server failover cluster link. This will run the SQL Server 2008 Setup wizard.
    There are a couple of glitches when you get to this point. One of them is a popup error with an error message "failed to retrieve data for this request" while in this step. I've seen a Microsoft Connect item on this but refers to CTP6 so I was thinking it has already been resolved. After a few searches and questions asked, SQL Server MVP Geoff Hiten advised that prior to adding another node in the cluster, any cumulative update should be pre-applied to the node before the main installation as the cluster install of the RTM version has some bugs. This creates a patched install script for the RTM installer to use. The fix started with cumulative update 1 so, technically, you can apply any cumulative update. Sounds weird, but it works. You still have to apply the patch after the installation.

  3. In the Setup Support Rules dialog box, validate that the checks return successful results and click OK.
  4. In the Product Key dialog box, enter the product key that came with your installation media and click Next.
    Again, a few glitches on this step. This might seem unusual as you are only being asked about the Product Key. There is also a Microsoft Connect item for this which basically asks you to run the setup.exe in command prompt. There is a popup error with an error message "The current SKU is invalid" while in this step. This usually happens when you use a media with a supplied product key, like the one that comes with an MSDN subscription. What worked for me was to copy the installation media on a local disk, locate the file DefaultSetup.ini file from the installation files and delete it or move it to different location. If you opt to delete the file, make sure you note down the product key written on this file as you will need to manually key this in during the installation process. This forum post will give you quite a few options to solve this issue
  5. In the License Terms dialog box, click the I accept the license terms check box and click Next.
  6. In the Setup Support Rules dialog box, click Install. Validate that the checks return successful results. Again, make sure to fix any errors returned by this check before proceeding with the installation.
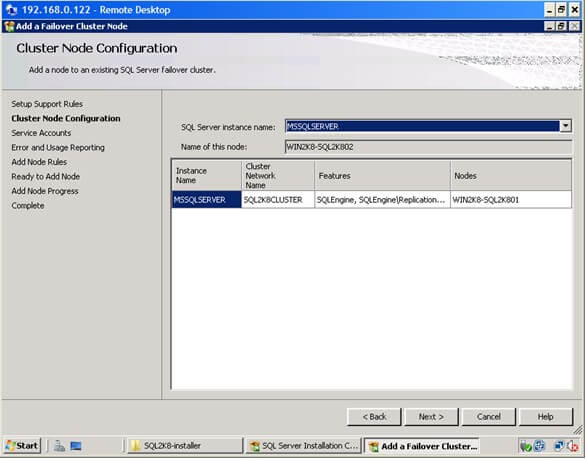
  7. In the Cluster Node Configuration dialog box, validate that the information for the existing SQL Server 2008 cluster is correct.

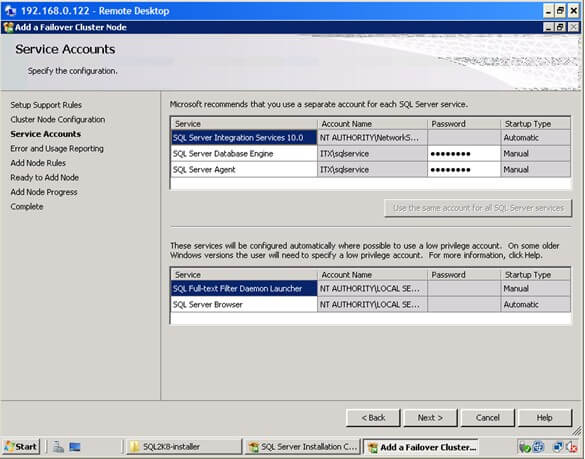
  8. In the Service Accounts dialog box, verify that the information is the same as what you have used to configure the first node.

  9. In the Error and Usage Reporting dialog box, click Next
  10. In the Add Node Rules dialog box, verify that all checks are successful and click Next
  11. In the Ready to Add Node dialog box, verify that all configurations are correct and click Install
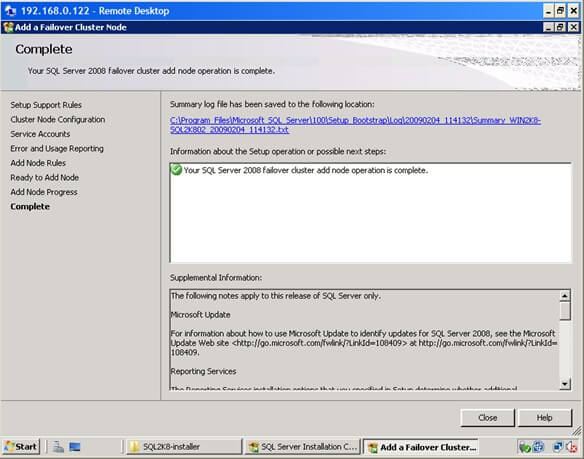
  12. In the Complete dialog box, click Close. This concludes adding a node to a SQL Server 2008 Failover Cluster

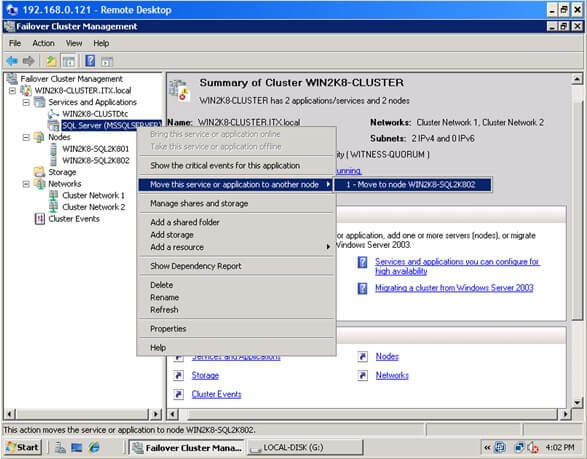
You can validate your cluster installation by expanding the Services and Applications node and check the cluster name of your SQL Server instance.  You can now see an option to move the service to another node, in this case, the node you've just added in your failover cluster

Applying patches on a SQL Server 2008 cluster

Part of the tasks of a DBA is to apply patches on the database engine and a SQL Server 2008 failover cluster is no exception. In fact, it is not as straight-forward as applying patches and service packs on a stand-alone server. It is important to note that when applying patches or service packs to a SQL Server failover cluster, you should apply them first on the passive node. After completing the installation on the passive node, failover the SQL Server 2008 cluster resource to this node making it the active node. Once the SQL Server service and all other dependencies are up, you can, then, apply the patches on the new passive node. The latest available patch for SQL Server 2008 is cumulative update 4 and is available for request from Microsoft.  For more information, check out this Microsoft KB article. You will have to request for the patch from Microsoft as it is not available from the Microsoft Download Center. The screenshots below show cumulative update 3 (version 10.0.1600.22) but the process is basically the same. Also, note that even though you may have already applied the cumulative update due to the bug mentioned above for adding a node in a failover cluster, you still have to apply the patch on both nodes

To apply patches on a SQL Server 2008 failover cluster node:

  1. Run SQLServer2008-KB960484-x86.exe(this would depend on the cumulative update that you want to apply) from the hotfix package you have requested from Microsoft
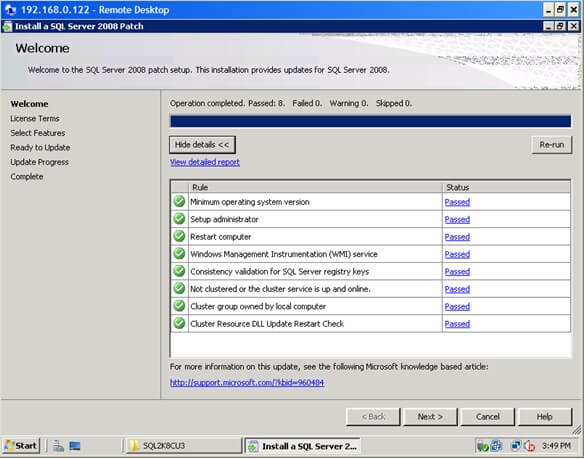
  2. In the Welcome dialog box, validate that the checks return successful results.

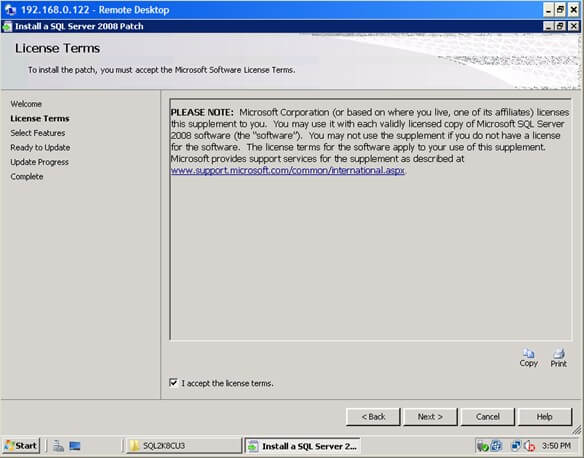
  3. In the License Terms dialog box, click the I accept the license terms check box and click Next

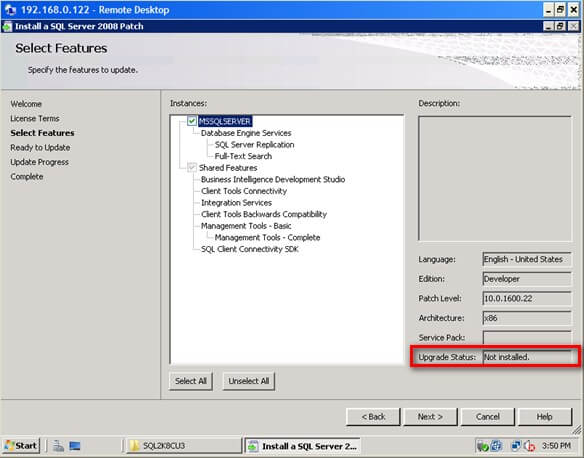
  4. In the Select Features dialog box, validate the SQL Server 2008 components by clicking on the check box.  TheUpgrade Status field will tell you whether or not the patch has already been applied. Click Next

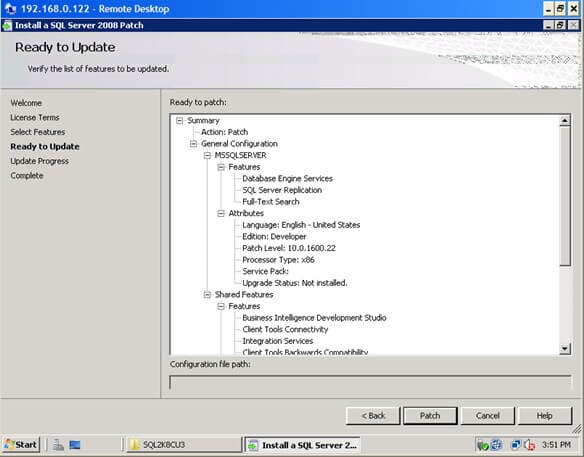
  5. In the Ready to Update dialog box, verify that all configurations are correct and click Patch

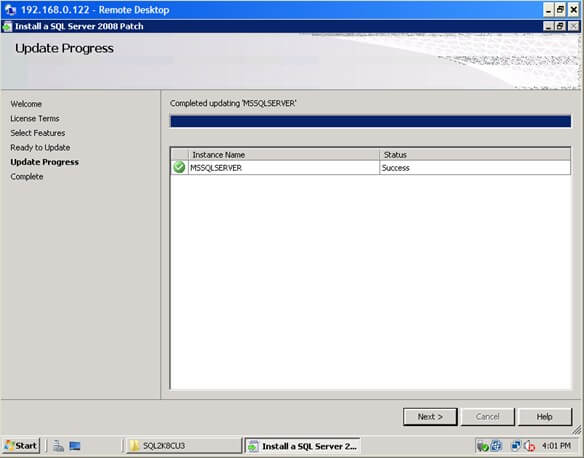
  6. In the Update Progress dialog box, validate that the installation was successful.

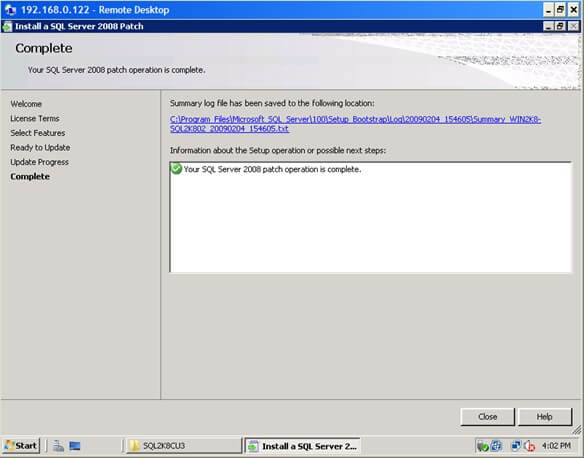
  7. In the Completedialog box, click Close. This concludes patching the passive node of a SQL Server 2008 Failover Cluster

After successfully installing the patch on the passive node, move the SQL Server 2008 cluster resource to this node so it will become the new active node. Make sure that all the SQL Server 2008 cluster dependencies are online prior to applying the patch on the other node.  Repeat the process outlined above to the new passive node. A more comprehensive approach for applying a SQL Server 2008 patch to a failover cluster instance is defined in this Microsoft KB article

Congratulations! You now have a working two-node SQL Server 2008 failover cluster running on Windows Server 2008.

Next Steps

  • Download and install an Evaluation copy of Windows Server 2008 and SQL Server 2008for this tip
  • Review Part 1, Part 2 and Part 3of this series
  • Start working on building your test environment in preparation for building a SQL Server 2008 cluster on Windows Server 2008

Install SQL Server 2008 on a Windows Server 2008 Cluster Part 3

Problem

In a previous tip on SQL Server 2008 Installation Process, we have seen how different SQL Server 2008 installation is from its previous versions. Now, we have another challenge to face: installing SQL Server 2008 on a Windows Server 2008 Cluster. Windows Server 2008 has a lot of differences from its previous versions and one of them is the clustering feature. How do I go about building a clustered SQL Server 2008 running on Windows Server 2008?

Solution

To continue this series on Installing SQL Server 2008 on a Windows Server 2008 Cluster, we will look at installing SQL Server 2008 in a failover cluster. In Part 1, we have completed the installation of the Application Server role in both of the servers that we will be using as part of our cluster. Part 2 walked you through the installation of the Failover Cluster Feature, validating the servers that will be a part of the cluster, and creating the cluster. In this tip, we will proceed to install SQL Server 2008 in a clustered Windows Server 2008 environment.

Installing and Configuring MSDTC

The Microsoft Distributed Transaction Coordinator (MSDTC) is a transaction manager that permits client applications to include several different data sources in one transaction and which then coordinates committing the distributed transaction across all the servers that are enlisted in the transaction. A lot of people ask why we need to install MSDTC prior to installing SQL Server. If you are using distributed transactions or running SQL Server on a cluster, this is definitely a must. SQL Server uses the MSDTC service for distributed queries and two-phase commit transactions, as well as for some replication functionality.

Configuring MS DTC in Windows Server 2003 clusters as defined in this Microsoft KB article is not pretty straight-forward. Windows Server 2008 made it simpler by providing a more straightforward process with fewer steps and less configuration.

To install and configure MSDTC:

  1. Open the Failover Cluster Management console on any of the cluster node.
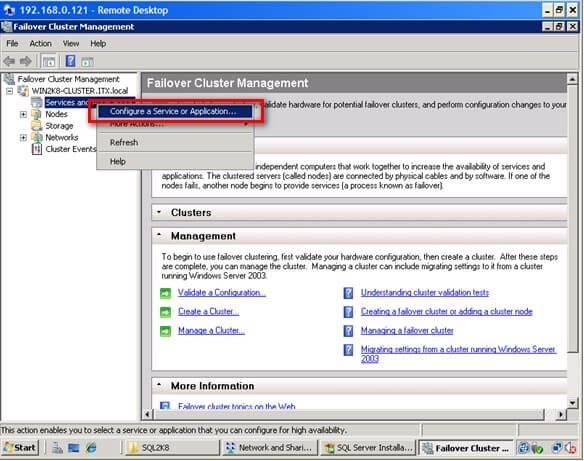
  2. Under the cluster name, right-click on Server and Applications and select Configure a Service or Application. This will run the High Availability Wizard

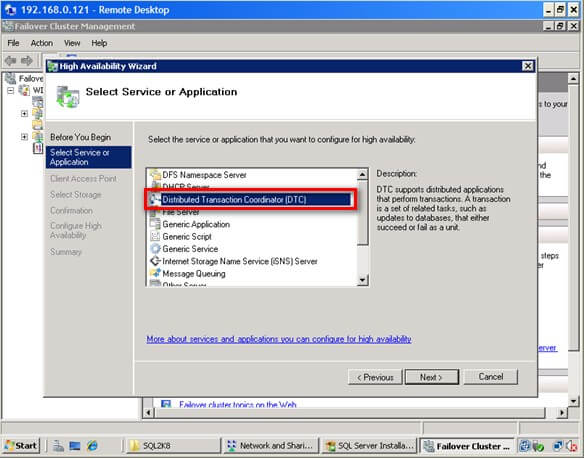
  3. In the Service or Application dialog box, select Distributed Transaction Coordinator (DTC) and click Next.

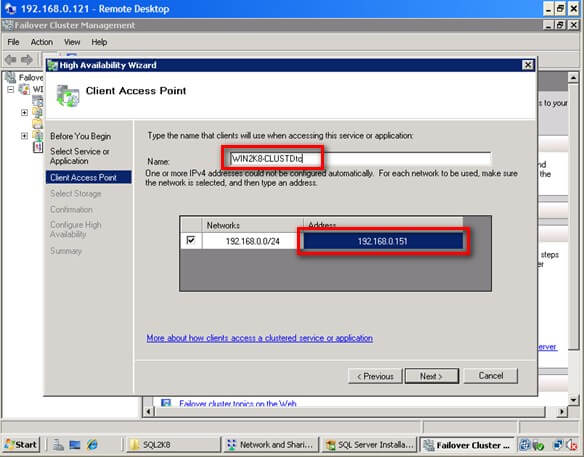
  4. In the Client Access Point dialog box, enter the name and IP address of the clustered MSDTC. This should be a different IP addresses and host name from the one that the Windows Server 2008 cluster is already using. Click Next.

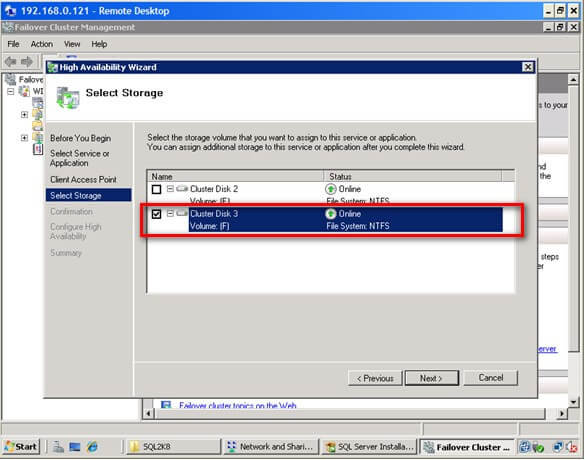
  5. In the Select Storage dialog box, select the disk subsystem that will be used by MSDTC. These disk subsystems have to be defined as available storage in your cluster. In the example below, I have used the disk volume F:\ and left the disk volume E:\ for SQL Server later in the installation process. Click Next

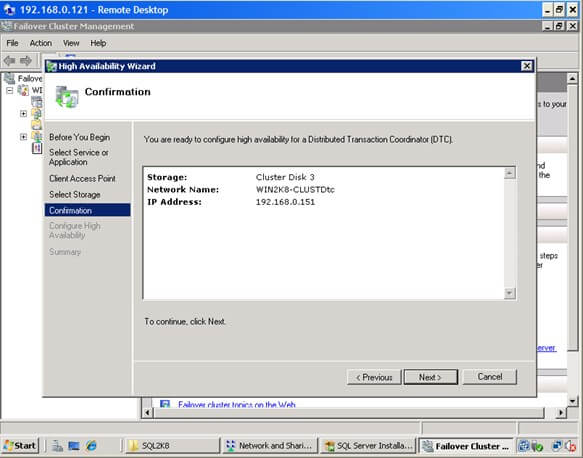
  6. In the Confirmation dialog box, validate the configuration you have selected for MSDTC and click Next

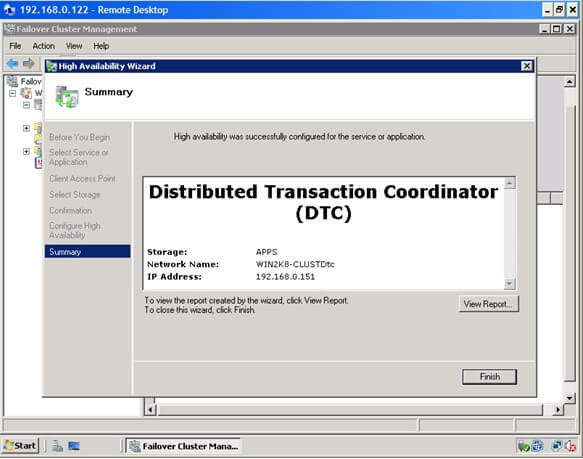
  7. In the Summary dialog box, click Close. This completes the installation of MSDTC on the cluster.

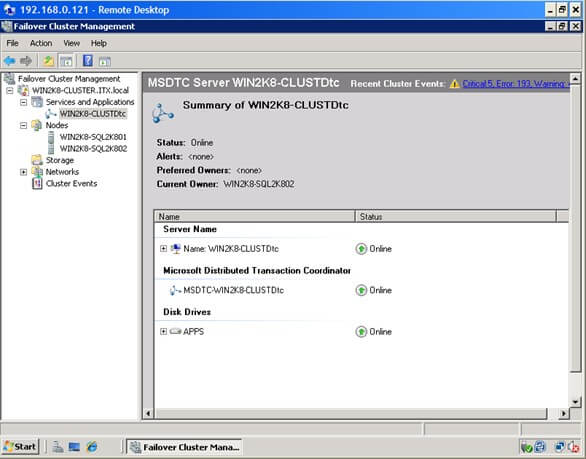
You can validate your installation of MSDTC by expanding the Services and Applications node and check the cluster name of MSDTC.  Make sure that all of the dependency resources are online

Installing SQL Server 2008 on a Windows Server 2008 cluster

You've gone this far, don't stop now. Only after we have managed to prepare everything can we proceed to install SQL Server 2008 on this cluster. Since we've already installed .NET Framework 3.5 with Service Pack 1 and Windows Installer 4.5 from Part 1, we no longer have to worry about them as they both are prerequisites whether you are doing a single server or a cluster installation. There are two options to install SQL Server 2008 on a cluster. The first one is by using the Integrated failover cluster install with Add Node option and the second one is the Advanced/Enterprise installation option. The process outlined below will take into account the first option.

To install SQL Server 2008:

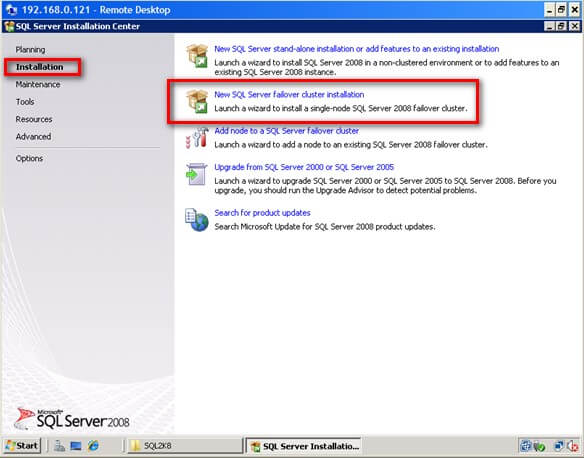
  1. Run setup.exe from the installation media to launch SQL Server Installation Center. Click on the Installation link on the left-hand side
  2. Click the New SQL Server failover cluster installation link. This will run the SQL Server 2008 Setup wizard

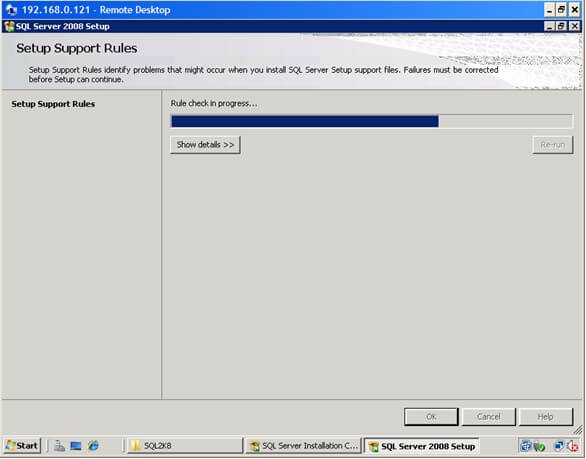
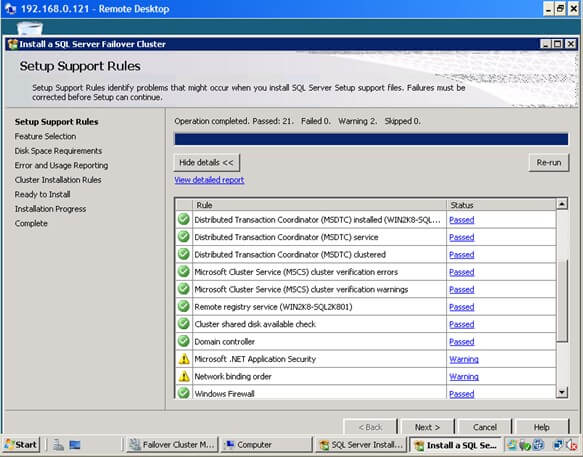
  3. In the Setup Support Rules dialog box, validate that the checks return successful results and click Next.

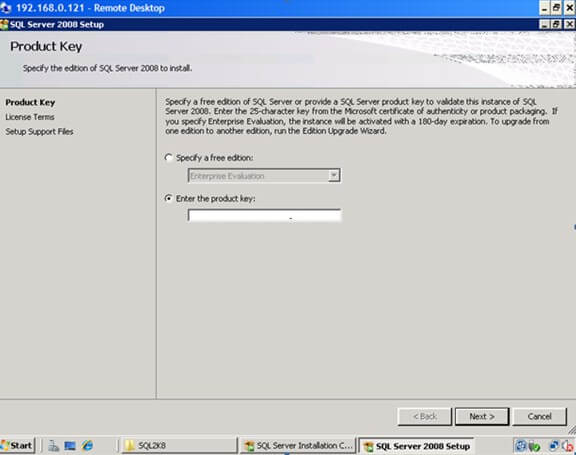
  4. In the Product Key dialog box, enter the product key that came with your installation media and click Next.

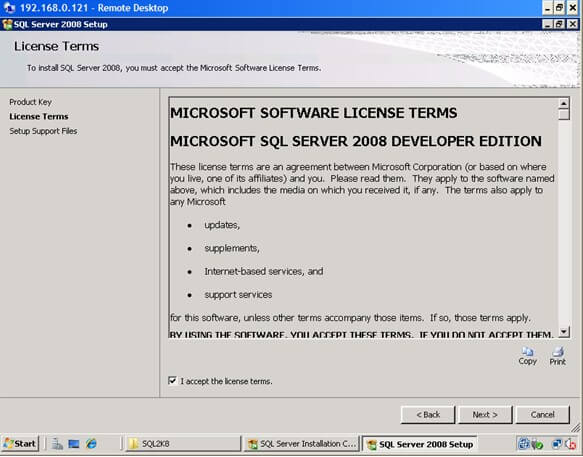
  5. In the License Terms dialog box, click the I accept the license terms check box and click Next. You probably haven't read one of these, but if you feel inclined go for it.

  6. In the Setup Support Rules dialog box, click Install. Validate that the checks return successful results. If the checks returned a few warnings, make sure you fix them before proceeding with the installation. An example of this is the Network binding order. The public network cards should be first on both nodes. Also, you can disable NETBIOS and DNS registration on the network cards to avoid network overhead. Be sure to check your binding order as well.  For more details on the network binding order warning, see Microsoft KB 955963.

    For the Windows Firewall, make sure that you open the appropriate port number on which SQL Server will communicate. You can do this after the installation. Alternatively, you can disable Windows Firewall during the installation and enable it later with the proper configuration. Click Next to proceed.

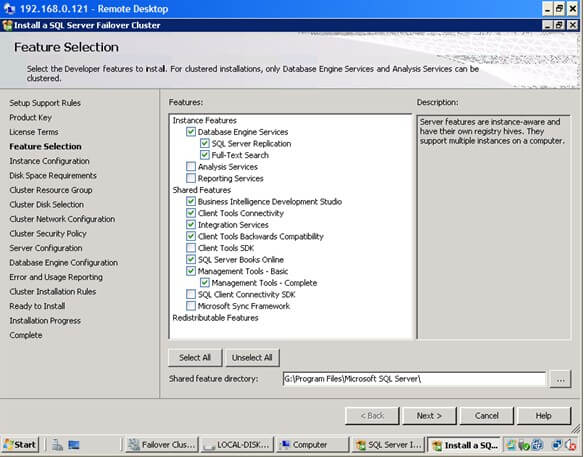
  7. In the Feature Selection dialog box, select only the components that you want installed. For the Shared feature directory, you can keep the default path if you have sufficient disk space on your C:\ drive or anywhere that is a local disk as this will be used by the SQL Server installation process later on. The directory for the clustered database engine will be different. Click Next.

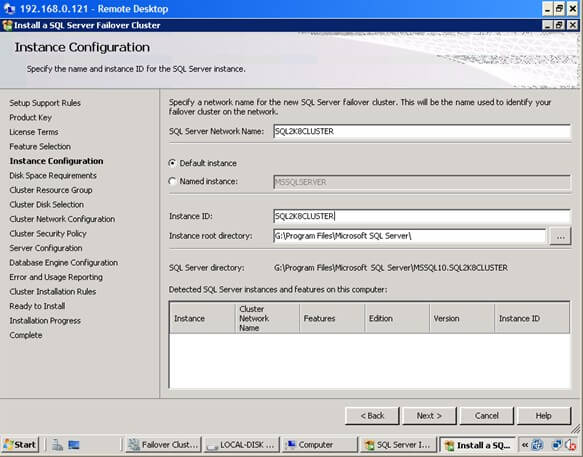
  8. In the Instance Configuration dialog box, enter the SQL Server Network Name. This is the name that will be available on the network for the clients. This will vary depending on your selection of whether it is a default or named instance. In this example, default instance is selected.

    A couple of things need highlighting in this section. By default, the instance name is used as the Instance ID. This is used to identify installation directories and registry keys for your instance of SQL Server and is helpful when you want to run multiple instances in a cluster. This is the case for default instances and named instances. For a default instance, the instance name and instance ID would be MSSQLSERVER. To use a non-default instance ID, you should select the Instance ID box and specify a value.

    The section on Detected SQL Server instances and features on this computer would make sense if there are other SQL Server instances running on your server.

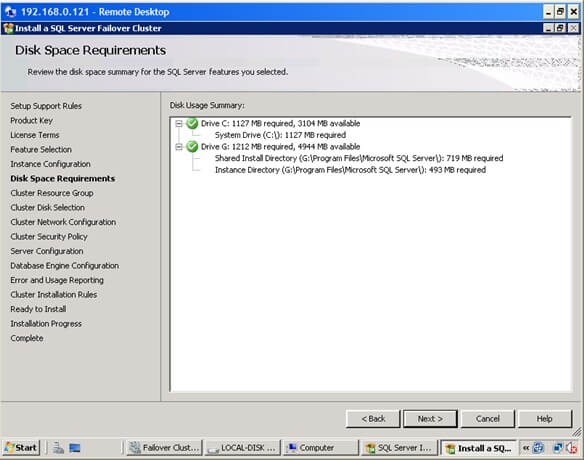
  9. In the Disk Space Requirements dialog box, check that you have enough space on your local disks to install the SQL Server 2008 binaries and click Next.

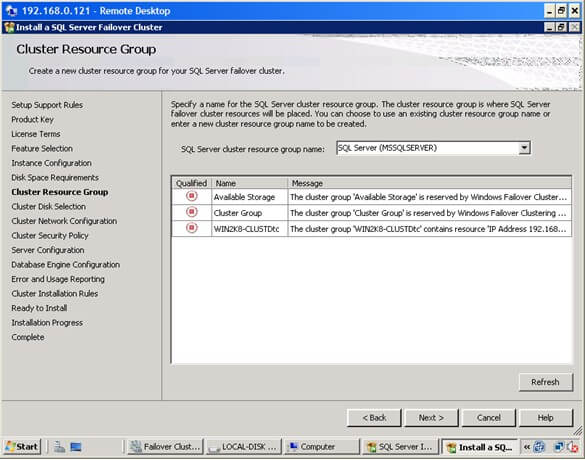
  10. In the Cluster Resource Group dialog box, check the resources available on your Windows Server 2008 cluster. This will tell you that a new Resource Group will be created on your cluster for SQL Server. To specify the SQL Server cluster resource group name, you can either use the drop-down box to specify an existing group to use or type the name of a new group to create it. Click Next.

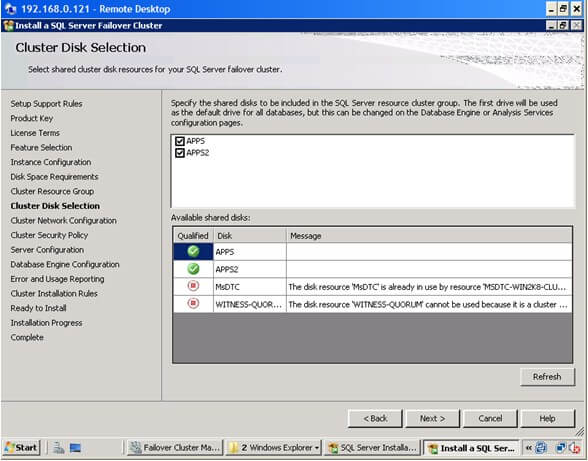
  11. In the Cluster Disk Selection dialog box, select the available disk groups that are on the cluster for SQL Server 2008 to use. In this example, two clustered disk groups – APPS and APPS2 – have been selected to be used by SQL Server 2008. I will be using one disk resource for the system databases while the other one for the user databases. Click Next.

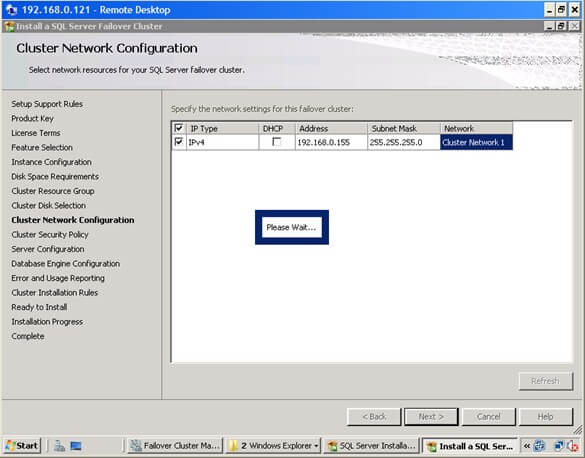
  12. In the Cluster Network Configuration dialog box, enter the IP address and subnet mask that your SQL Server 2008 cluster will use. Deselect the checkbox under the DHCP column as you will be using static IP addresses. If you have not disabled your IPv6 adapters and protocols, it would be better to uncheck the row for IPv6

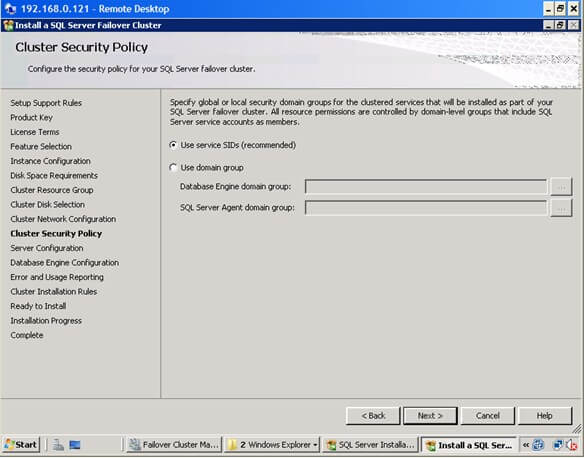
  13. In the Cluster Security Policy dialog box, accept the default value of Use service SIDs (recommended). In Windows Server 2003, we specify domain groups for all SQL Server services but in Windows Server 2008, this is the recommended option. For more information on using service SIDs for SQL Server 2008, check out this MSDN article

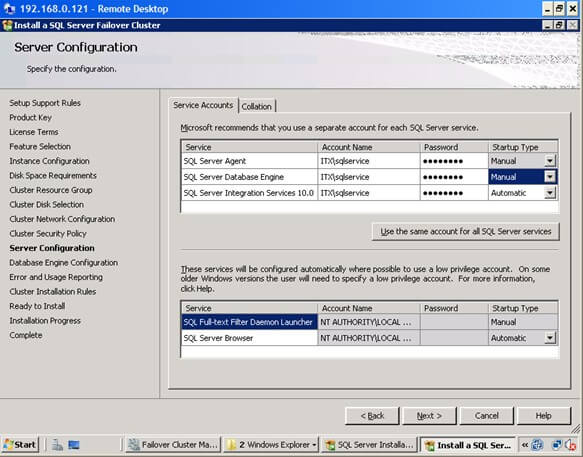
  14. In the Server Configuration dialog box, enter the credentials that you will use for your SQL Server service accounts in the Service Accounts tab. In the Collation tab, select the appropriate collation to be used by SQL Server. Note that the startup type is set to manual for all cluster-aware services and cannot be changed during the installation process. Click Next.

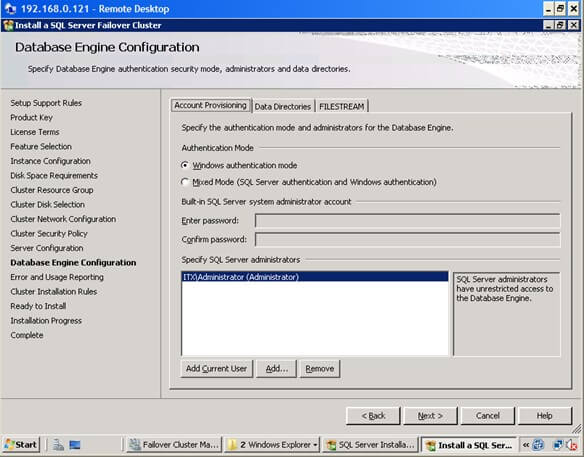
  15. In the Database Engine Configuration dialog box, select the appropriate Authentication Mode. If you want to add the currently logged on user to be a part of the SQL Server administrators group, click the Add Current User button.

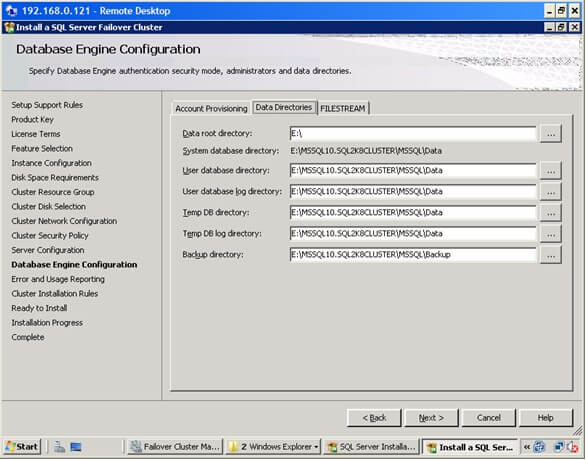
    On the Data Directories tab, enter the path where your system and user database files will be created. This will default to the first shared disk in the cluster so in case you want to change it to the other shared disks to be used by SQL Server 2008, modify accordingly. If you intend to use the new FILESTREAM feature, click the FILESTREAM tab and set the appropriate configurations. Click Next

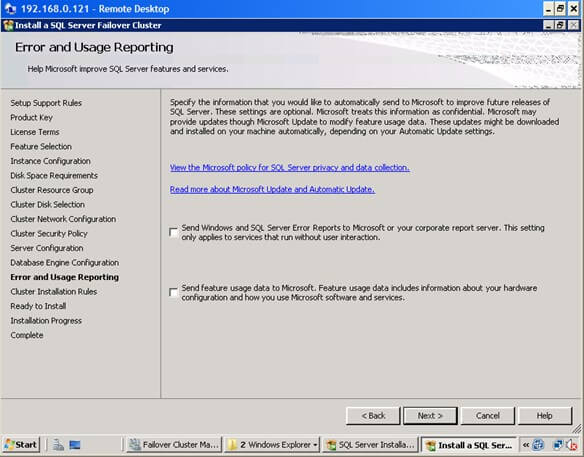
  16. In the Error and Usage Reporting dialog box, click Next.

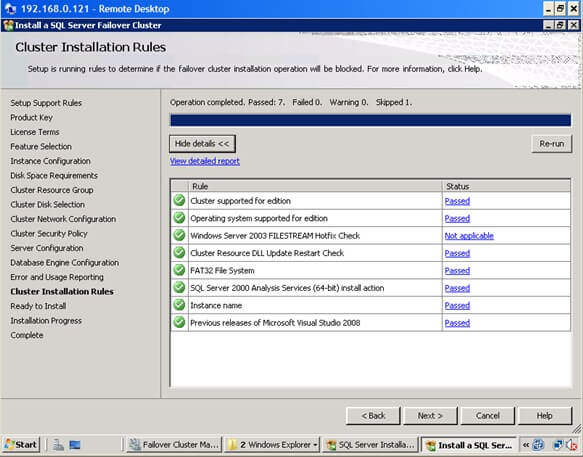
  17. In the Cluster Installation Rules dialog box, verify that all checks are successful and click Next.

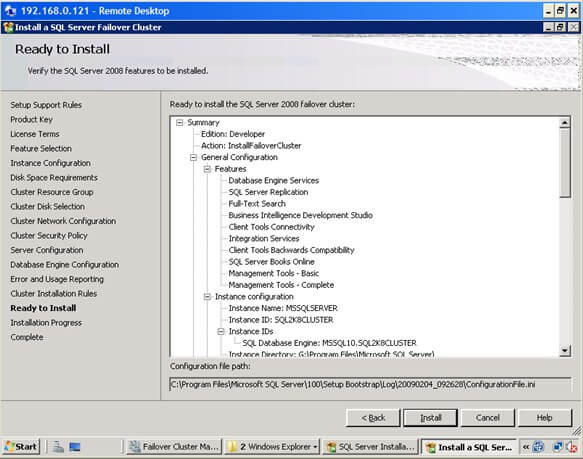
  18. In the Ready to Install dialog box, verify that all configurations are correct. Click Next.

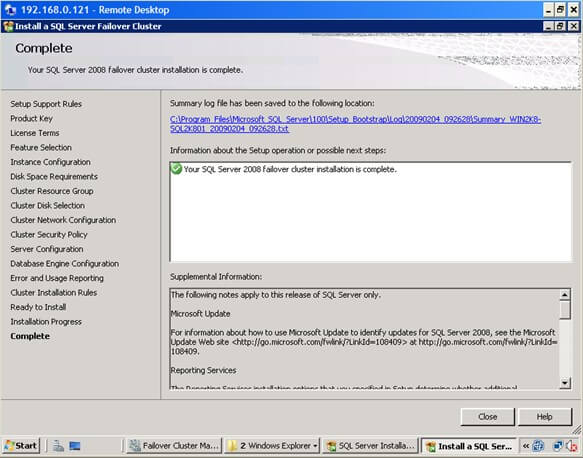
  19. In the Complete dialog box, click Close. This concludes the installation of a SQL Server 2008 Failover Cluster

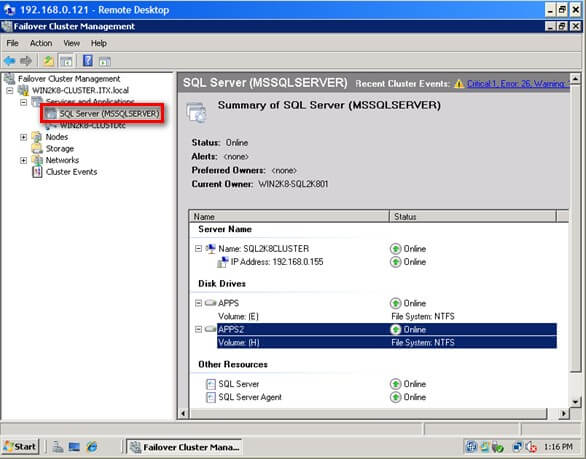
At the completion of a successful installation and configuration of the node, you now have a fully functional failover cluster instance. To validate, open the Failover Cluster Management console, and click on SQL Server (MSSQLSERVER) under Services and Applications. Make sure that all dependencies are online

Although we do have a fully functioning SQL Server 2008 failover cluster, it does not have high-availability at this point in time because there is only one node in the failover cluster. We still have to add the second node to the SQL Server 2008 cluster. In the last part of this series, we will add the second node in the failover cluster and install the latest cumulative update

Next Steps

  • Download and install an Evaluation copy of Windows Server 2008 and SQL Server 2008 for this tip
  • Read Part 1, Part 2  and Part4 of this series
  • Start working on building your test environment in preparation for building a SQL Server 2008 cluster on Windows Server 2008