Managing and troubleshooting AIF document exchanges

We will cover the process of common management and troubleshooting tasks on the AIF.
Managing AIF document exchanges
In Dynamics AX, we can check document logs, view document messages, or manually import messages. We can also peak at which documents are in the pipeline
for Dynamics AX to process. This can all be accomplished using the AIF Queue manager form. To access the Queue manager form in Dynamics AX, go to Basic |
Periodic | Application Integration Framework | Queue manager.
image
To view a history of document exchanges in Dynamics AX, go to Basic | Periodic | Application Integration Framework | Document history. The Document history
form contains detailed information on documents and how they are to be processed.
image
Methods for troubleshootingWhen attempting to diagnose issues with the AIF, there are a couple of methods at your disposal that will assist in isolating issues. The following is a list of possible
methods:
• Consult the AIF Exception Log
• Consult the Windows Event Log
• Consult endpoint's logs
The AIF exception log can be accessed in Dynamics AX by going to Basic | Periodic | Application Integration Framework | Exceptions.
image
For additional AIF troubleshooting tips refer to: http://technet.microsoft.com/en-us/library/aa548693.aspx

Managing and troubleshooting AIF document exchanges

We will cover the process of common management and troubleshooting tasks on the AIF.
Managing AIF document exchanges
In Dynamics AX, we can check document logs, view document messages, or manually import messages. We can also peak at which documents are in the pipeline
for Dynamics AX to process. This can all be accomplished using the AIF Queue manager form. To access the Queue manager form in Dynamics AX, go to Basic |
Periodic | Application Integration Framework | Queue manager.
image
To view a history of document exchanges in Dynamics AX, go to Basic | Periodic | Application Integration Framework | Document history. The Document history
form contains detailed information on documents and how they are to be processed.
image
Methods for troubleshootingWhen attempting to diagnose issues with the AIF, there are a couple of methods at your disposal that will assist in isolating issues. The following is a list of possible
methods:
• Consult the AIF Exception Log
• Consult the Windows Event Log
• Consult endpoint's logs
The AIF exception log can be accessed in Dynamics AX by going to Basic | Periodic | Application Integration Framework | Exceptions.
image
For additional AIF troubleshooting tips refer to: http://technet.microsoft.com/en-us/library/aa548693.aspx

Setting up AIF to use a filesystem adapter

At times, data is exchanged between two systems using a filesystem. In other words, files are placed in a directory and read from a directory. For Dynamics AX to process documents in a filesystem, the AIF must be set up to use a filesystem adapter. To set up a filesystem adapter, perform the following steps:
1. First, we must create a filesystem adapter. To specify the transport adapter, go to Basic | Setup | Application Integration Framework | Transport  adapters. In this example, we will be using the filesystem adapter. Create a
new record and select the AifFileSystemAdapter class.
image
Hint:
When you create a new record in the Transport adapters form,the system scans for any classes in the AOT that implements the interface class AifIntegrationAdapter. In this example, we will be using the filesystem adapter.
2. Now that you have created the transport adapter, the next step is to activate the transport adapter. To do this, mark the Active field for the AifFileSystemAdapter record.
image
Specifying channelsSince we have activated the transport adapter that implements the AifFileSystemAdapter, a channel must also be created. A channel defines the transport method for processing documents. Depending on the type of adapter in
use, an address or location is specified for document exchanges. To create a channel, perform the following steps:
1. Before we can set up the channel, we must create the appropriate inbound and outbound folders since we are using the filesystem adapter. Open Windows Explorer and create a new folder called AIF (for example: C:\AIF).
image
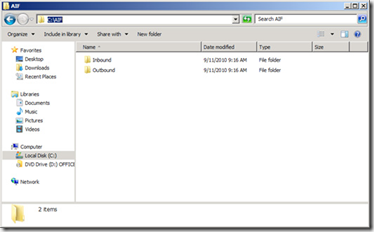
2. Within the newly created AIF folder, create two folders: one called Inbound, which will contain documents received for Dynamics AX to process, and another called Outbound for Dynamics AX to place documents that will
be sent.
image
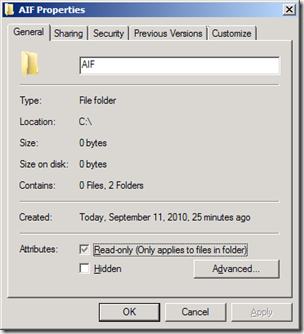
3. Now that the folders have been created, we need to set permissions for the AIF folder to allow the AOS service account to be able to modify the folder contents. To do this, right-click on the AIF folder and click on Properties.
image
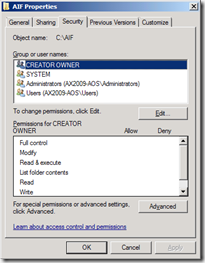
4. In the AIF Properties window, go to the Security tab.
image
5. Click on the Edit… button to modify the permissions on the folder.
image
6. Click on Add… to add the AOS service account. When complete, click on the OK button.
image
7. Now that the AOS service account has been added, we need to allow Full Control permissions. When completed click on OK to save the changes.
image
8. Now that the folders are created and the permissions are set, we can specify the folders as appropriate channels for the filesystem adapter. Go to Basic | Setup | Application Integration Framework | Channels. Create a new record and then click on the General tab and fill in the appropriate fields. In this step, we will create an Inbound Channel, which is the channel that will handle incoming documents.
image
9. In order to process data and send data to be processed by other systems, we must now create an Outbound Channel. The process is the same as when configuring an Inbound Channel, as shown in the following screenshot:
image
10. In order to associate the Outbound Channel to the Inbound Channel, we must explicitly specify that relation. To do this, select the Inbound Channel previously created in the Channel form and specify the Response channel
to the newly created Outbound field, as shown in the following screenshot. Therefore, the system can respond independently to the Inbound Channel after incoming requests.
image
Hint: In a multi-AOS environment such as a clustered or load-balanced setup, any AOS can process documents if they are available to do so. To enable this feature, mark the Parallel processing checkbox. This method allows
documents to be processed more quickly.
11. After one or more channels have been set up, you must define actions that can be utilized by the AIF service. To do this, go to Basic | Setup | Application Integration Framework | Action. You have the flexibility to
enable up to six actions per service (create, read, find, findKeys, update, and delete). To enable an action, simply mark the action's Enabled field.
image
Specifying external endpointsExternal endpoints in Dynamics AX are simply referred to as Endpoints. When an endpoint is set up, you can control various options, such as which services and actions are available to external systems. There can be multiple endpoints for a single transport method of document exchange. In this section, we will cover the process of
setting a simple endpoint.
1. In Dynamics AX, go to Basic | Setup | Application Integration Framework | Endpoints to load the Endpoints form.
image
2. In the Endpoints form, create a new record. Specify the local endpoint that we previously created and save the record.
image
3. Before we can proceed, we must disable or enable constraints. Constraints are used to control which data is available to specific warehouses, vendors, customers, and so on. In this example, we will disable constraints.
image
4. Now we can enable actions that will be available for use to an external system. To create an action, click on the Action policies button.
image
Hint: Endpoint actions will be available only if they are enabled on the specified service in Basic | Setup | Application Integration Framework | Services.

5. In this example, we will simply allow a read action on a specific service. To do this, click on the lookup button on the Action ID field and select a read action on an available service (for example: CustCustomerService.read).
image
6. By default, the action is disabled. To enable the action, so that it is available to an external system, change the Status field value to Enabled.
image
7. With the endpoint's action now enabled, we can specify further restrictions or policies, such as which fields are permitted. To do this, click on the Data policies button. This will open the Parameter Data Policies form.
image
8. Click on the Data policies button to open the Endpoint action data policies form.
image
9. To make a field available on the service for an endpoint, it must be enabled. To enable a field for access, mark the Enabled field (to quickly enable all fields click on Set | Enable all). To make a field as a required field when
inserting a new record or querying a service, mark the Required field. Some fields may already be marked Required if they are mandatory fields because on the table level, the fields have been specified as mandatory fields.
image
10. In the General tab, specify an Outbound channel ID and mark the Active
field to enable the endpoint.
image
Now that we have specified all the steps necessary for creating a file adapter for document exchange, documents can now be created and placed in the Inbound folder. Dynamics AX will then read the documents in the Inbound folder in the order they are created, process them, and output results in the Outbound folder for access. If this process does not work as expected, the following section will show you how to troubleshoot such issues.

Configuring AIF in Dynamics AX

Before the AIF can be used, it must be set up and configured. For example, endpoints must be specified to determine which company in Dynamics AX, AIF will exchange
data with. This section will cover the rudimentary configuration of the AIF, regardless of the transport adapter used. The following checklist outlines the required steps
before you can begin to implement an adapter for document exchange:

1. Specify global settings.
2. Provide local endpoints.
Specifying global settingsVarious general settings are available to tweak the AIF. Some of these settings can be overridden in the individual implementation either in the adapter or services
themselves. For example, the default encoding format can be specified but can also be overridden, if necessary. The purpose of these settings is to streamline typical settings
when creating services. Additionally, these settings can also be manipulated to tweak performance, such as the cache lifetime or resource locking. To modify these settings,
go to Basic | Setup | Application Integration Framework | Global settings.
image
Specifying local endpointsLocal endpoints determine where a document or message will ultimately be received or sent from, in Dynamics AX. There can be multiple local endpoints for a single transport method of document exchange. Since Dynamics AX provides a multi company setup, it is possible to have multiple local endpoints point to multiple companies at the same time. There is at least one company for any local endpoint. In this section, we will cover the process of setting a simple local endpoint.

1. To begin the process of specifying an endpoint, go to Basic | Setup |Application Integration Framework | Local endpoints.
image
2. In the Local endpoints form, create a new line and select the company account that will be the local endpoint for document exchange and provide a name for the endpoint.
image

Testing Dynamics Ax Workflow

After Installing and Configure the Dynamics AX workflow,  the best way to test the Workflow system is Running an actual Workflow Depending on your license scheme, Dynamics AX will be equipped with default Workflow templates. In this example, we will cover the process of testing the Workflow system using the Purchase requisition workflow template.

1. In Dynamics AX, go to Account Payable | Setup | Workflow configurations to load the Workflow configuration form specific for Accounts Payable
business processes.

image

2. In the Workflow configuration form, select the PurchReqApproval template from the Template drop-down.

image

3. To create a new Workflow configuration for Purchase requisitions, click on the New button. The Create configuration: Select a template form will load. Select Purchase requisition approval and click on the Create configuration button to start creating the new configuration.

image

4. After you have clicked on the Create configuration button, a new form Workflow: Purchase requisition approval will load.

image

5. Provide the relevant field information in the current view. Various fields are required to be filled out in order to save a configuration. In this view, we must provide text in the Submission instructions field. You can set a specific condition that will allow this workflow to initiate. If the condition isn’t satisfied, the workflow will not proceed. For example, perhaps you would want the workflow to be used for Purchase requisitions that have a specific value. Instead of waiting for the workflow to run in order to verify that it works on specific conditions, you can simply test the conditions as you create them by clicking on the Test condition button. This will allow you to test your conditions on existing Purchase requisitions.

image

6. In the next step, we must specify the required parameters for the complete and approval stage of the Purchase requisition workflow template. Each workflow may have different stages and each stage has fields that are required to be populated. To specify the parameters for the complete and approval stages in the Purchase requisition workflow, click on the Details tab.

image

7. Select the PurchReqComplete task to specify the parameters for the complete stage as you did when you were in the General tab. When you have specified the required fields, collapse the PurchReqApproval task and select Step 1.

image

8. You must also assign a user, group, or role that can approve the PurchReqComplete task. To specify a user, click on the Assignment tab.

image

9. To specify a user, click on the Choose button. This will load the Assignment
form where you can select a specific user, group, role, or hierarchy. You can
also specify a time limit for how long a task must be approved by until it
expires. Once you have specified the appropriate parameters, click on the
OK button.

image

10. In the Step 1 step of the PurchaseReqApproval task, you must specify the same parameters in both the General and Assignment tabs as you did in the
previous step.

image

11. When complete, save the workflow configuration by closing the form. You
should be back in the Workflow configuration form in the General tab. You will also notice a record has been created with a version number and checkbox field, which—when marked—activates the current Workflow configuration version. To mark the checkbox, click on the Set as active button. Every time you modify a Workflow configuration version, a new version is automatically created. In order to activate a new version, ensure that you deactivate the previous version before activating the version you want to work with, by clicking on the Set as inactive button. Once you have activated the PurchReqApproval workflow, it will now be used to process
Purchase requisition workflows.

image

12. Now that we have created the workflow configuration for Purchase requisitions, the next step is to perform a Purchase requisition workflow. To start this process, open the Purchase requisitions form by going to Accounts Payable | Common Forms | Purchase Requisition Details.

image

13. Create a new Purchase requisition by creating a new record in the form.
This will load the Create purchase requisition form. In the form, specify the mandatory fields. When complete, click on the OK button to create the Purchase requisition.

image
14. Now that the Purchase requisition has been created, you must add at least
one item to the Purchase requisition. To add an item, click on the Add item button or create a new line in the Lines section and select an item to add.

image

15. Once you have added an item and saved the record, the workflow info area
will appear at the top of the form that states the workflow template name and a button to submit the current step. Click on the Submit button to submit the Purchase requisition. This will also load a form that provides a textbox to enter a comment for you submission. After specifying a comment, click on the Submit button to finally submit the workflow.

image

16. Once you submit the workflow, the Purchase requisition workflow info area will be updated with the employee name and the time of the last submission on the selected Purchase requisition.

image

17. Once you submit the workflow, it will be sent to the workflow batch job that was created earlier in this chapter. You can press F5 to refresh the Purchase requisition form to view the latest workflow status. The batch job will communicate with the workflow web service, which will process the workflow logic. Once it is processed, the results will be sent back to Dynamics AX that will update the workflow. To see the current progress of the workflow, click on Actions | View history.

image

18. In the Workflow history form, you will be able to view the workflow details of the current Purchase requisition. To view the most recent status of the workflow, click on the Refresh button.

image

19. In the Purchase requisitions form, refresh the form by pressing F5. Once updated, the Actions button should now list additional options such as Complete, Reject, Request Change, and Delegate. Select the appropriate task to continue the workflow until it is complete, where it will automatically create a Purchase Order based on the Purchase requisition.

image

In this blog, we initiated an actual Purchase requisition workflow to test if the
Workflow system is functioning properly. If you were able to successfully submit a
workflow without any errors, then the Workflow system is working properly. Errors
can result from permissions not being set up properly on the Workflow web service
or the Business Connector pointing to the wrong AOS or employee setup. The View
history form and Windows Event Log will assist in determining the source of
any errors.