Sharing Business Information the Easy Way: Microsoft Dynamics AX 2012 Enterprise Portal - Inside Microsoft Dynamics AX - Site Home - MSDN Blogs

Sharing Business Information the Easy Way: Microsoft Dynamics AX 2012 Enterprise Portal - Inside Microsoft Dynamics AX - Site Home - MSDN Blogs:


Too often, organizations make business data and business applications available only to back-office workers. By limiting access in this way, they miss out on the benefits of providing everyone in the company with real-time information and the ability to make informed decisions quickly enough to keep up with the competitive, ever-changing business world.
On the face of it, sharing business information should be straightforward, but in reality, there are some challenges, including business applications that were not designed with sharing in mind and a variety of user interfaces to choose from. Enterprise Portal in Microsoft Dynamics AX 2012 addresses these challenges by providing a web-based interface to the enterprise resource planning (ERP) system, and prebuilt support for a number of common business processes.
In Microsoft Dynamics AX 2012, we’ve made some major improvements to Enterprise Portal to:
  • Make it easier for people to complete tasks in fewer steps and in less time.
  • Help businesses respond quickly to changing needs and opportunities.
  • Lower the costs associated with installing and maintaining web applications and portal sites.
Easy to Use
We heard from customers and partners that the user interface has a strong influence on the adoption and, therefore, on the long-term return-on-investment (ROI) of an ERP solution. In this release, the Enterprise Portal user interface has gone through a major revision, making it much easier for business users to navigate. We modeled the user experience on the familiar Microsoft Office and Windows interfaces, so the user experience should be more intuitive and consistent across all the Microsoft products that people use every day. In addition, we reduced the number of steps required to complete common tasks and made information and actions more easily discoverable, which should reduce the time people spend completing routine tasks.
Flexible and Extensible
Our customers also tell us that they need to constantly update business processes in response to changing market conditions or to improve operational efficiencies. The latest release of Enterprise Portal supports this need for agility by simplifying the development cycle and providing a set of first-class development tools.
Most notably, we’ve adopted a model that lets you share code between Microsoft Dynamics AX and the web-based portal environment. This approach can significantly reduce the development effort required to implement customizations in the parallel environments, while also ensuring easier maintenance and consistency across the two platforms.
In addition, we’ve upgraded the development tools for the Enterprise Portal in both MorphX and Microsoft Visual Studio so that developers can work in X++, Microsoft ASP.NET, or any other .NET language. We’ve also made it possible for multiple developers to work on the same code on the same server, so that teams can build applications more quickly
Simple to Install and Maintain
Deploying and maintaining applications on a large website can be a daunting task for the administrator. The Enterprise Portal team has invested heavily, building several utilities that simplify the installation and configuration process, as well as the day-to-day maintenance of your portal site.
During install, we’ve included a utility that developers can run before deployment or during setup to verify the readiness of the machines and detect prerequisites, eliminating many of the time-consuming, tedious tasks associated with implementing Enterprise Portal, especially across complex topologies.
After you set up Enterprise Portal, you can easily deploy subsequent changes by using a command-line utility that you can execute from a remote machine. This simplifies the management of multiple servers from a single place. The command-line utility also provides options to granularly deploy updates to a single Enterprise Portal site or to bulk update all websites with all changes.
Changes to the security model in Microsoft Dynamics AX also make it easier to manage large numbers of external users. In this release, we’ve added support for claims-based authentication so that customers can choose among standard Windows authentication methods, a separate database of user names and passwords, or connecting to an external identity management system, such as a Windows Live ID.
In this interview, Anees Ansari, Program Manager for the Enterprise Portal, provides a good overview (including a demo) on the advances made in the Enterprise Portal technology in MS Dynamics AX2012


Microsoft Dynamics AX 2012 BI


Microsoft Dynamics AX 2012 BI and Reporting includes more
than 800 Microsoft SQL Server® Reporting Services reports, 11
SQL Server Analytics Server data cubes, and enhancements to
the framework.
Microsoft SQL Server Reporting Services
• Microsoft Dynamics AX production reports combine the power
of SQL Server Reporting Services with the simplicity and flexibility
of Microsoft Dynamics AX. Along with more than 800 built-in
reports, Microsoft Dynamics AX 2012 will provide a wizard-based
migration tool for existing X++ reports and integrated, role-based
security options.
• Help meet exacting reporting requirements and reduce IT workload,
with auto-generation of SQL Server Reporting Services reports,
and create basic reports using the Microsoft Visual Studio® 2010
Charting Control.
• Support global operations: develop a report in one language, and
let the reporting framework produce reports in multiple languages.
Microsoft SQL Server Analysis Server
• Instantly identify and take action on business process issues
using new cubes for workflow and environmental sustainability.
Track history and current status, and generate performance
analysis reports.
• Easily implement, configure, and customize prebuilt data cubes
using a wizard-driven UI, which helps you deploy prebuilt business
intelligence solutions when you set up Microsoft Dynamics AX 2012.

Create a VHD File

Steps to create a VHD File:
1- Install Windows 7 on your machine (Host OS) .
2- Boot your machine with Windows Server 2008 R2 from a DVD or USB.
3- At the welcome Screen, Press Shift + F10 to enter the command prompt.
4- Type diskpart and press enter.
5- Creatae a VHD File => create vdisk file="c:\WinServer2008R2.vhd" maximum=25000 type=fixed and press enter.
    **type = fixed or expandable (For development enviroment Fixed is better because the I/O will be much faster than expandable)
    **maximum = Size of VHD file in MB
6- select the VHD File => select vdisk  file="c:\WinServer2008R2.vhd" and press enter.
7- Attach VHD => attach vdisk and press enter.
8- Exit diskpart => exit and press enter.
9- Close the command prompt and continue in installation.
10- Choose your new VHD (will appear as a partition) to install your Windows Server 2008 R2.

I am running SharePoint 2010 smoothly now :)

To Manage your boot menu in windows 7.
Use the command bcdedit.exe, from command prompt, but you need to run it as administrator.

Renameserver: Stsadm operation (Office SharePoint Server )

Description

Changes the name of the specified server in the configuration database.
This operation is used before or after a server is renamed in the domain to avoid having to rebuild the server or farm.

Syntax

stsadm -o renameserver
-oldservername
-newservername

Parameters

Parameter name and short formValueRequired?Description
oldservernameA valid server name, such as "OldServer"YesThe old name of the server listed on the Servers in Farm page of the SharePoint Central Administration Web site.
newservernameA valid server name such as "NewServer"YesThe new name of the server listed on the Servers in Farm page of the SharePoint Central Administration Web site.

Remarks

The renameserver operation cannot be used to rename query and index servers.
If the renameserver operation is used to make a name change on a computer that runs SQL Server and hosts the configuration database, then the renameserver operation must be run on every front-end Web server and application server in the farm. However, if the renameserver operation is used to make a name change on a computer that runs SQL Server and hosts databases other than the configuration database, you only need to run the renameserver operation on one server in the farm.

Main link http://technet.microsoft.com/en-us/library/cc263117(office.12).aspx

Workflow error messages “Invalid message sequence”

We often get following error messages concerning workflow:

Dynamics Adapter CallStaticClassMethod failed.
SysWorkflowEventService-onAcknowledgeWorkItem Invalid message sequence - missing Activation message.
Microsoft.Dynamics.BusinessConnectorNet.XppException
at Microsoft.Dynamics.BusinessConnectorNet.Axapta.CallStaticClassMethod(String className, String methodName, Object[] paramList) at Microsoft.Dynamics.Framework.BusinessConnector.Session.DynamicsAdapter.CallStaticClassMethod(String className, String methodName, Object param1, Object param2)


When these occur, none of the workflow items are processed anymore. In Basic –> Inquiries –> Workflow history you can see that all workflow items has status “Pending”


Usually error SysWorkflowEventService-onAcknowledgeWorkItem Invalid message sequence - missing Activation message can mean two problems:


1. Business Connector connect to different AOS.
2. In Workflow configuration you did not create messages in user language.


To resolve first problem:


1. Go to Microsoft Dynamics AX 2009 Configuration
2. Change “configuration target” to “Business Connector (non-interactive use only)”
3. Check on connection tab if there is correct AOS mentioned
By default Workflow during connection to AOS is using active Dynamics AX BC.NET configuration.


To be able to set up different configuration in web.config you need to apply kernel hotfix and follow instruction given in KB 960801: https://mbs.microsoft.com/knowledgebase/KBDisplay.aspx?scid=kb$EN-US$960801&wa=wsignin1.0


If you have hotfix KB 960801 installed and BC.NET still is connecting to wrong AOS please double check in GAC (usually C:\windows\assembly) if library Microsoft.Dynamics.Framework.BusinessConnector.dll and the Microsoft.Dynamics.Framework.Communications.dll has version higher than 5.0.1500.144 for DAX 2009 SP1 and 5.0.593.262 for DAX 2009 RTM


To resolve second problem make sure that you have instructions set up in user language in workflow configuration


Manage the State Service (SharePoint Server 2010)

The State Service is a shared service that is used by some Microsoft SharePoint Server 2010 components to store temporary data across related HTTP requests in a SQL Server database. In SharePoint Server 2010, the State Service is required by InfoPath Forms Services (including out of the box and custom workflow forms), the SharePoint Server 2010 Chart Web Part, and certain Microsoft Visio 2010 scenarios that do not use Microsoft Silverlight 3.

 
Configure the State Service


The State Service is automatically configured as part of the Basic installation of SharePoint Server 2010.

Advanced installation of SharePoint Server 2010 requires separate configuration of the State Service. You can configure the State Service after installation of SharePoint Server 2010 by using one of the following tools:
  • Farm Configuration Wizard
  • Windows PowerShell
 The default configuration for the State Service is the following:
   
  • One State Service service application.One State Service database on the same database server that contains the configuration database. The databases must be associated with the service application.
  • One State Service application proxy associated with the default proxy group of the server farm.
 The default configuration for the State Service is sufficient for most configurations. The following considerations might require additional configuration of the State Service:

 Hosted deployments Multiple deployments hosted on the same farm automatically partition forms and chart data so that tenants cannot see forms and charts of other tenants. Organizations that have policies requiring strict separation of hosted deployments might want to create new service applications and state databases for each deployment, with each service and database associated with a new Web application for the deployment. You should also closely monitor the performance of your hosted deployments, and consider creating new service applications and state databases when you anticipate performance issues with hosted deployments

 Scale for high-capacity use of forms or charts In rare cases, server farms with a very large number of InfoPath active state sessions for forms or charts might require additional State Service databases on the same service application to maintain capacity with acceptable performance. A database administrator that encounters performance issues such as excessive database locks can add databases to improve performance.

You can reconfigure the State Service after initial configuration by using Windows PowerShell.
  
Configure the State Service by using the Farm Configuration Wizard

After setup is finished, the opening page of the Farm Configuration Wizard opens automatically. The administrator can choose to run the wizard immediately or wait until later. In the Farm Configuration Wizard, all services that are not currently configured are selected for configuration by default. If you do not want to configure the State Service until later, you can clear the check box for the service and run the Farm Configuration Wizard later.

Note:
Until you configure the State Service, you will not be able to store session state data for forms, charts, and diagrams that use the State Service.

If the State Service check box is unavailable, it has already been configured. After initial configuration, you can only configure the State Service by using Windows PowerShell.
  To configure the State Service by using the Farm Configuration Wizard

1.On the Central Administration Web site, click Configuration Wizards.2.On the Configuration Wizards page, click Launch the Farm Configuration Wizard.
3.On the first page of the Farm Configuration Wizard, click Start the Wizard.
4.On the services configuration page, in the Services section, select the State Service check box.

Note: If the State Service check box is unavailable, the State Service is already configured. To make changes to the configuration you must use Windows PowerShell.
5.Click Next.
6.Complete any other configuration steps for the server farm.
7.On the final page of the Farm Configuration Wizard, click Finish.
Configure the State Service by using Windows PowerShell
The State Service can be configured by using Windows PowerShell. You can use Windows PowerShell during initial configuration instead of the Farm Configuration Wizard. You can also use Windows PowerShell to perform configuration tasks that are not available on the Central Administration site of the farm. The additional configuration tasks include:
Get information about a service application, database, or application proxy; or a list of all service applications, databases, and application proxies.
  • Change configuration parameters for a service application, database, or application proxy.
  • Pause and resume State Service databases.
  • Remove a State Service database.
  • Mount data to a database.
  • Install the State Service schema to an existing database, and change bindings between databases and service applications, or between proxies and proxy groups.Create State Service service applications and State Service Databases for hosted deployments. Create additional State Service databases for scaling high-capacity deployments for forms or charts, and associating them with the existing State Service service application.

 When you create a custom configuration of the State Service, consider the following points:
  •  A State Service service application is a container for one or more databases.
  • A State Service service application is bound to at least one State Service application proxy.
  • As with all Shared Services, State Service application proxies are bound to Web applications by using proxy groups.

Note:
If multiple State Service application proxies are in the same group, only the default application proxy will receive newly allocated data. All the application proxies with data are used during read operations.
   
For more information about configuring service applications, see Manage service applications (SharePoint Server 2010).
To configure the State Service by using Windows PowerShell
  
1.Verify that you meet the following minimum requirements: See Add-SPShellAdmin.
2.On the Start menu, click All Programs.
3.Click Microsoft SharePoint 2010 Products.
4.Click SharePoint 2010 Management Shell.
5.To create a service application, type the following command:
   
6.To create a State Service database and associate it with a service application, type the following command:
  
Copy Code New-SPStateServiceDatabase -Name "" -ServiceApplication $serviceAppWhere is the name of the State Service database to create and associate with the service application.
Note:
You must have at least one State Service database for each State Service service application. You can create additional databases in the same service application to increase capacity for forms and charts. Every database must have a unique name.
The previous command uses the default database instance on the farm and default database credentials. For more information about how to specify a different database server or database credentials, see New-SPStateServiceDatabase.
7.To create a State Service application proxy, associate it with the service application, add it to the farm's default proxy group, and type the following command:
Copy Code New-SPStateServiceApplicationProxy -Name "" -ServiceApplication $serviceApp -DefaultProxyGroupWhere is the name of the application proxy.
Note:
If you do not want to add the State Service application proxy to the default proxy group, do not specify the DefaultProxyGroup parameter.
  
For more information, see New-SPStateServiceApplication, New-SPStateServiceDatabase, and New-SPStateServiceApplicationProxy.
  
For more information about the available State Service cmdlets, see State service and session state cmdlets (SharePoint Server 2010).
  
Monitoring the State Service
Administrators can monitor the State Service by using the SharePoint Monitoring and Event reporting service. Monitoring the service can help confirm the service was properly configured and can also identify any configuration or setup issues associated with the service.
For more information about how to monitor performance of the State Service, see Health monitoring (SharePoint Server 2010).
Note:

Copy Code $serviceApp = New-SPStateServiceApplication -Name ""Where is the name for the service application.
You must have at least one service application for the State Service. In hosted deployments, each hosted partition can have its own service application, but it’s not necessary. The name of the service application must be unique. If you are creating an additional service application, you must replace the name text with a unique name.
  

SQL Writer Service

SQL Writer Service


SQL Server 2008 R2 Other Versions SQL Server "Denali" SQL Server 2008 SQL Server 2005

The SQL Writer Service provides added functionality for backup and restore of SQL Server through the Volume Shadow Copy Service framework.

 
The SQL Writer Service is installed automatically. It must be running when the Volume Shadow Copy Service (VSS) application requests a backup or restore. To configure the service, use the Microsoft Windows Services applet. The SQL Writer Service installs on all operating systems.

Purpose

 
When running, Database Engine locks and has exclusive access to the data files. When the SQL Writer Service is not running, backup programs running in Windows do not have access to the data files, and backups must be performed using SQL Server backup.
Use the SQL Writer Service to permit Windows backup programs to copy SQL Server data files while SQL Server is running.

 
Volume Shadow Copy Service

 
The VSS is a set of COM APIs that implements a framework to allow volume backups to be performed while applications on a system continue to write to the volumes. The VSS provides a consistent interface that allows coordination between user applications that update data on disk (writers) and those that back up applications (requestors).

The VSS captures and copies stable images for backup on running systems, particularly servers, without unduly degrading the performance and stability of the services they provide. For more information on the VSS, see your Windows documentation.

 
Virtual Backup Device Interface (VDI)

 
SQL Server provides an API called Virtual Backup Device Interface (VDI) that enables independent software vendors to integrate SQL Server into their products for providing support for backup and restore operations. These APIs are engineered to provide maximum reliability and performance, and support the full range of SQL Server backup and restore functionality, including the full range of hot and snapshot backup capabilities.

  
Note

 
A VSS writer (MSDE Writer) shipped with the VSS framework in Microsoft Windows XP and Microsoft Windows Server 2003. This writer coordinates with SQL Server 2000 and earlier versions to help in backup operations. Starting with SQL Server 2005 installation, SQL Writer is the preferred writer, though MSDE Writer will continue to work and will be the default writer if installed and SQL Writer is not enabled. To start and use the SQL Writer, first disable the MSDE writer from enumerating SQL Server 2005 databases.

Permissions

 
The SQL Writer service must run under the Local System account.

Features

 
SQL Writer supports:
  1. Full database backup and restore including full-text catalogs
  2. Differential backup and restore
  3. Restore with move
  4. Database rename
  5. Copy-only backup
  6. Auto-recovery of database snapshot
  
SQL Writer does not support:


  1. Log backups
  2. File and filegroup backup
  3. Page restore


The form cannot be rendered. This may be due to a misconfiguration of the Microsoft SharePoint Server State Service

If you have created your SharePoint 2010 farm manually without running the farm Configuration Wizard, you might encounter this error when you try to publish a page or stating a workflow:


 The form cannot be rendered. This may be due to a misconfiguration of the Microsoft SharePoint Server State Service. For more information, contact your server administrator.”


The problem is stat the State service is not configured since the Farm Configuration Wizard has not been run. Configure it with PowerShell using these instructions from Technet:


1.On the Taskbar, click Start, point to Administrative Tools, and then click Windows PowerShell Modules.


2.In Windows PowerShell, create a service application by typing $serviceApp = New-SPStateServiceApplication -Name “State Service”


3.Create a State Service database and associate it with a service application, by typing New-SPStateServiceDatabase -Name ”StateServiceDatabase” -ServiceApplication $serviceApp.


4.Create a State Service Application Proxy and associate it with the service application by typing New-SPStateServiceApplicationProxy -Name ”State Service” -ServiceApplication $serviceApp -DefaultProxyGroup.


Once these instructions are run, you have a shiny new State Service Service Application and you should be able to publish pages again. Remember to verify that your web Application is associated with the State Service Service Application.


Chart web part raising error (SharePoint 2010 )

. Go to "Application Management" --> "Manage service applications"


2. Check whether the "State Service" is enabled or not (like the below screenshot).


3. If the service is not started or missed, we should configure/start the state service. OK. How to start the service? proceed with step
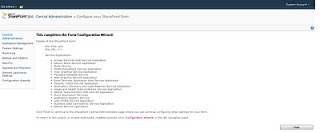
4.Go to the "Configuration Wizard" and start the configuration
5. Make sure the "State Service" is enabled. (Eventhough it is selected, run the wizard again.Hmmmm...That is microsoft :) )
6.Wait until you see the below screen (It will take few minutes to complete).


 7. Now, check whether the Chart contol are rendering properly in the browser or not. If everything is fine, then continue with your work.. Again if you are getting the same error screen, you need to check the "Service Associations" for your current web application (proceed with step 8).


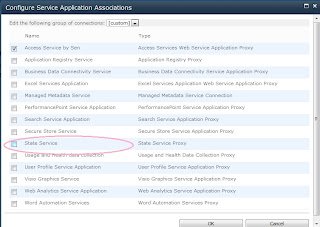
8. In "Central Administration", Go to "Application Management" and select the "Configure service application associations" in "Service Applications" section.

9. Click on your web application and a pop up windows will be displayed.


10. Select the "State Service" Check box and click "OK".

Error message when you post a purchase order in Microsoft Dynamics AX 2009


Error message when you post a purchase order in Microsoft Dynamics AX 2009: "Cannot create a record in Purchase order header - Updating table (PurchParmSubTable)"

SYMPTOMS

When you post a purchase order in Microsoft Dynamics AX 2009, you receive the following error message:
Cannot create a record in Purchase order header - Updating table (PurchParmSubTable).
This problem occurs if one of the following conditions is true:
You enable the "Life sciences electronic signature audit trail setup" setting for all tables.
You create a record for the Common table.
You set the PurchParmTable table in the database log.
This problem occurs when you post a purchase order, a receipts list, a packing slip, and an invoice.

This problem occurs in the following products:
Microsoft Dynamics AX 2009 with Service Pack 1
Microsoft Dynamics AX 2009

SOLUTION


Code changes

Microsoft provides programming examples for illustration only, without warranty either expressed or implied. This includes, but is not limited to, the implied warranties of merchantability or fitness for a particular purpose. This article assumes that you are familiar with the programming language that is being demonstrated and with the tools that are used to create and to debug procedures. Microsoft support engineers can help explain the functionality of a particular procedure. However, they will not modify these examples to provide added functionality or construct procedures to meet your specific requirements. Always test code fixes in a controlled environment before you apply the fixes to your production computers.

To resolve this problem, follow these these steps:
1.Overwrite the code in the insert method in the PurchParmSubTable table as follows:
public void insert()
{
    PurchParmSubTable tempPurchParmSubTable;
    ;

    select tempPurchParmSubTable where
        tempPurchParmSubTable.ParmId == this.ParmId
        && tempPurchParmSubTable.TableRefId == this.TableRefId
        && tempPurchParmSubTable.OrigPurchId == this.OrigPurchId;
    if(tempPurchParmSubTable.RecId == 0)
    {
        super();
    }
}
2.Overwrite the code in the createFromPurchParmTable method in the PurchParmSubTable table as follows:
static PurchParmSubTable createFromPurchParmTable(PurchParmTable _purchParmTable, boolean _insert = true)
{
    PurchParmSubTable   purchParmSubTable;
    systemSequence systemSequence;
    ;

    ttsbegin;

    purchParmSubTable.clear();
    purchParmSubTable.initValue();
    purchParmSubTable.initFromPurchParmTable(_purchParmTable);

    if (_insert)
    {
        systemSequence = new systemSequence();
        purchParmSubTable.RecId = systemSequence.reserveValues(1, tablenum(PurchParmSubTable));
        purchParmSubTable.insert();
    }

    ttscommit;
    return purchParmSubTable;
}
3.Overwrite the code in the insert method in the SalesParmSubTable table as follows:
public void insert()
{
    SalesParmSubTable tempSalesParmSubTable;
    ;

    select tempSalesParmSubTable where
        tempSalesParmSubTable.ParmId == this.ParmId
        && tempSalesParmSubTable.TableRefId == this.TableRefId
        && tempSalesParmSubTable.OrigSalesId == this.OrigSalesId
        && tempSalesParmSubTable.subId == this.subId;
    if(tempSalesParmSubTable.RecId == 0)
    {
        super();
    }
}
Note You must merge any existing customizations in these methods.

SharePoint install blocked due to Comptability issues on Windwos Server 2008 R2

SharePoint install blocked due to compatibility issues on Windows 2008 R2You'll get this message if you try to install SharePoint on a fresh install of Windows 2008 R2.

As of this posting both MOSS packed with sp2 and the Kbase doc referenced in the message (KB962935) are not available. The workaround, however, is very simple.

"This program is blocked due to compatibility issues"

The problem in a nutshell is any MOSS install package be it the RTM or MOSS w/sp1 don't have the latest updates in it. Because you've presumably updated your Windows 2008 and 2008 SQL Server with the latest patches, you can't install MOSS unless you repackage it with the SP2 update files. The instructions below explain how to, in a sense, repackage your MOSS install bundle with the latest updates.

1. Create a temp directory... C:\Temp2
2. Download the 2007 Microsoft Office Servers Service Pack 2 (SP2)
3. Start > Run and paste in the line below
C:\Temp2\officeserver2007sp2-kb953334-x64-fullfile-en-us.exe /extract:C:\Temp2\
4. Go to your SharePoint install and delete all the files in the "Updates" folder
5. Copy all the extracted files from step 3 to the Updates folder.
6. Install! Main link